
In this short tutorial we will learn How to setup the Keil uvision IDE on a Windows 10 /11 System, Compile an Embedded C program and generate hex code for the 8051/8052 architecture.
Keil uvision IDE is a popular embedded software development IDE which is widely used to program the 8051/8052 architecture. It is quite popular in the Academic as well as Engineering community.
Downloading Keil uVision IDE
Keil uVision IDE is a proprietary IDE developed by Keil Inc .Keil provides a code limited (2K bytes) evaluation version for 8051 architecture (C51) which is sufficient for learning purposes.
The main limitations of the evaluation version are the following.
8051 compiler, assembler, linker, and debugger are limited to 2 Kbytes of object code
Programs that generate more than 2 Kbytes of object code will not compile
The debugger supports programs that are 2 Kbytes or smaller
No hardware support for multiple DPTR registers is provided
If you think your programs may generate more than 2K Bytes of Object code ,you can use the Free and Opensource Small Device C compiler (SDCC) for your Project.
If you are new to SDCC, you can check out our Tutorial on using SDCC to compile embedded C code for 8051 microcontroller architecture
Keil uVision IDE (Evaluation Version) can be downloaded using this link.
On Clicking the above link you will be redirected to Keil Website Download section.
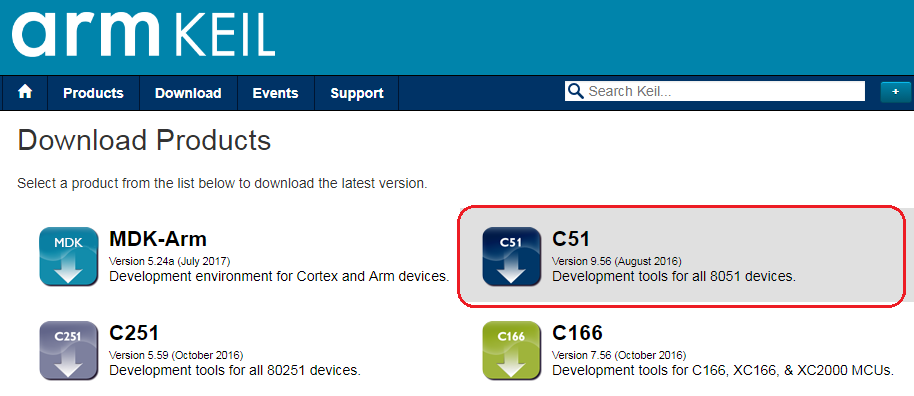
Please click on the C51 icon to download 8051 development tools .
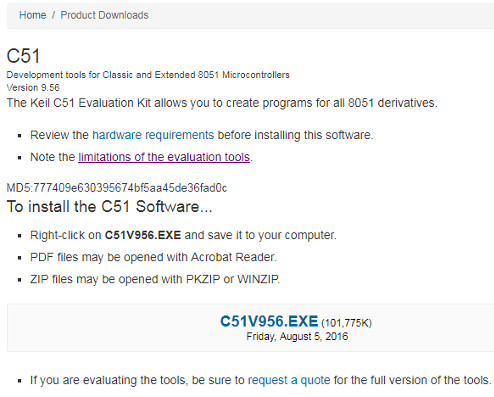
You will then be asked to fill out a form. After you have successfully completed filling the form ,you can download Keil C51 tools as shown below.
Creating a 8051/8052 Project using Keil uvision IDE
After you have installed the Keil uVision tools for 8051 ,Double click on the Keil icon on your Windows Desktop to launch the IDE.
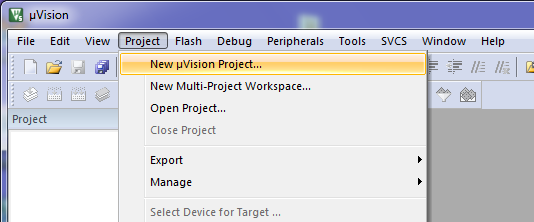
To create a new 8051 project using Keil IDE, Click on the ' Project ' item on the IDE Menu bar and select ' New uVision Project... ' as shown in the below image.
Now create a Folder to store your project and give a name to your Project files (*.uvproj), for eg Test (Test.uvproj).
After that you will be taken to the device selection dialog, where you can select the 8051 derivative for which you want to develop software.
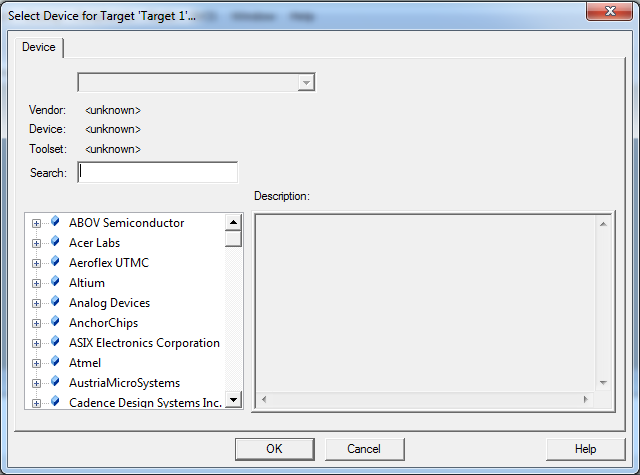
Keil has support for a wide variety of 8051 derivatives on its IDE. The 8051 derivatives are organized according to their manufacturer's.
For eg : Lets assume that you are developing code for ATMEL AT89S52 ,you can click on the ATMEL link on the bottom left pane and then browse for your chosen microcontroller here AT89S52.Alternatively you can also use the Search box on top to search for your particular part number.
Here i am using W78E052D from Nuvoton for my project.
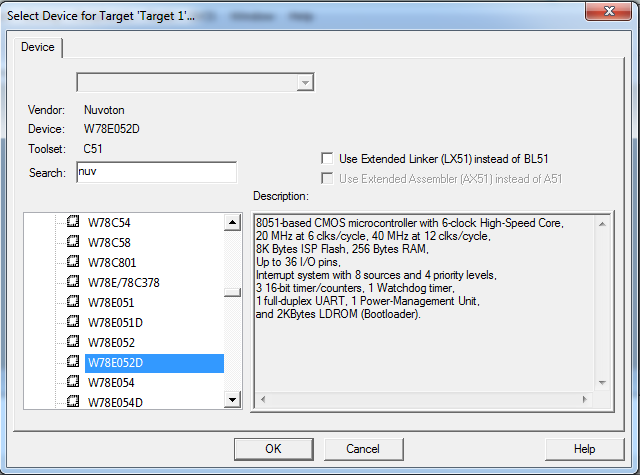
On selecting the particular microcontroller the Keil IDE also displays the features of the selected microcontroller on its left pane .You can Click OK to confirm your choice.
You will get another dialog as shown below.

Click ' Yes '
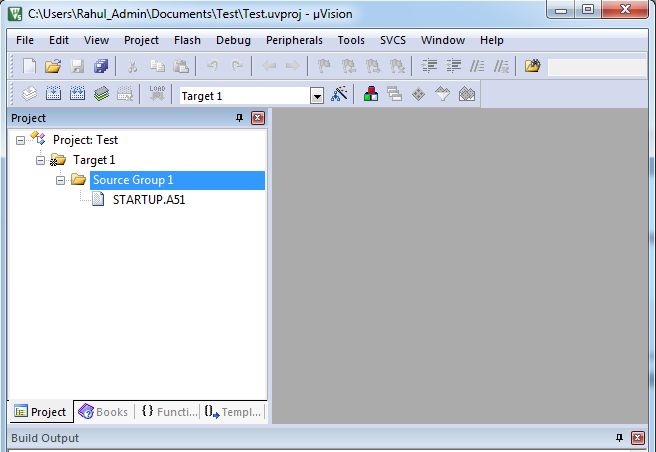
Now your Project pane on the Kiel IDE would look something like this (below image)
Now you can add C files to you Project.
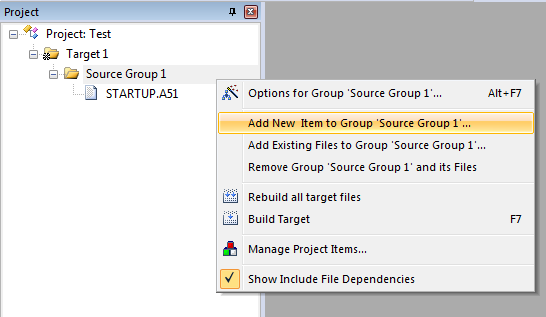
Right Click on the Source Group 1 folder on your Project pane and select Add New Item to Group 'Source Group1'...
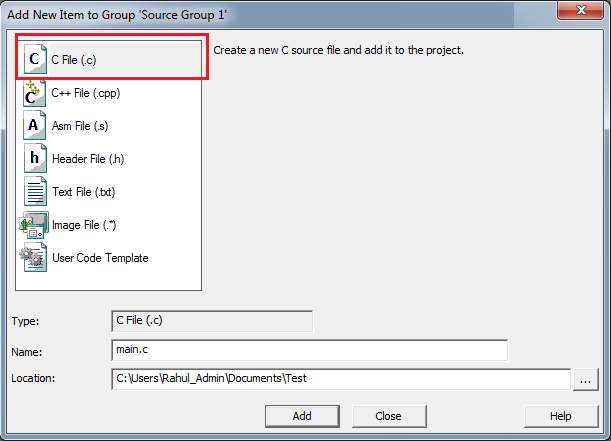
Now you can select the type of file you want to add to your project using the top pane.
Select C File(.c) and give it a name (here main.c) and Click Add.
Now you can type a small program into the main.c to blink the LED's connected to Port 1 of 8051 .You can find the source code below.
//8051 Code (main.c)

#include <reg51.h>

void delay(void);

void main(void)
{
   while(1)
   {
        P1 = 0xFF; // Turn ON all LED's connected to Port1
        delay();
        P1 = 0x00; // Turn OFF all LED's connected to Port1
        delay();
   }
}

void delay(void)
{
   int i,j;
   for(i=0;i<0xff;i++)
        for(j=0;j<0xff;j++);
}
Building a C Project using Keil uVision IDE
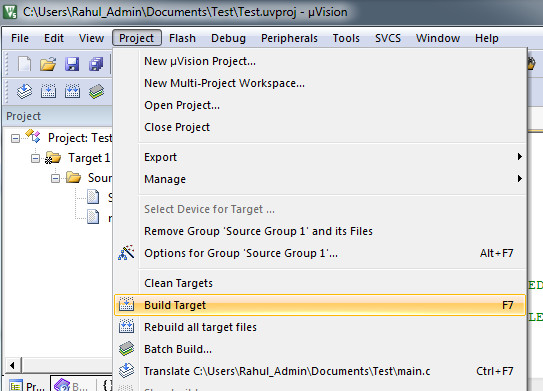
After you have typed out the above c program to your main.c file, You can compile the C file by pressing F7 key or by going to ' Project -> Build Target ' on the IDE menu bar.
If there are no errors the code will compile and you can view the output on the Build Output pane.

Generating 8051 HEX File using Kiel IDE
In the above example we have only compiled our main.c file. In order to download the code into the 8051 microcontroller we have to generate the corresponding hex code .
In Keil uVision IDE you can generate hex file for your 8051 derivative by,
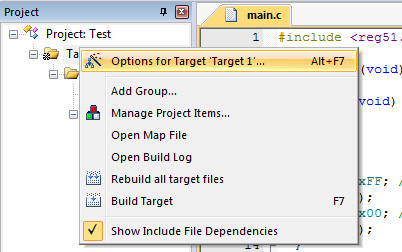
Right Clicking on the ' Target 1 ' Folder and Selecting Options for Target 'Target1'....
Then on the Options for Target ' Target 1' Dialog ,
Select the Output tab and check the Create Hex File option and Press OK.
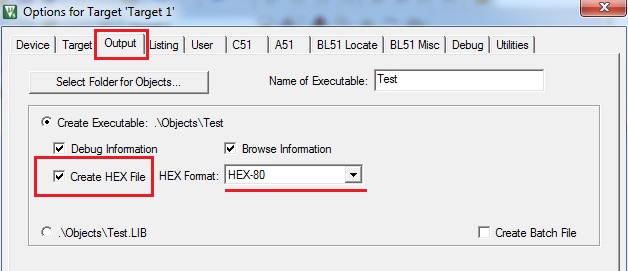
Now rebuild your project by pressing F7.
Kiel IDE would generate a hex file with same name (here Test.hex) as your project in the Objects folder .
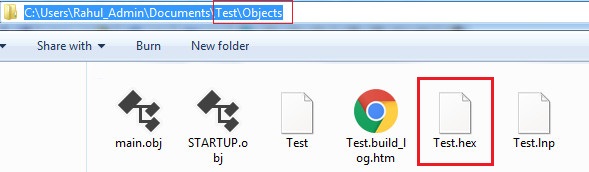
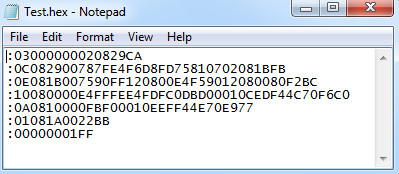
You can also open the Test.hex file with notepad to view the contents.
Downloading Generated HEX code into 8051 Microcontroller
After you have generated your hex code using Kiel IDE ,You can upload the code into your 8051 derivative.
Uploading hex code is specific to the 8051 derivative you are using. For example some microcontrollers like P89V51 and Nuvoton W78E052D have build in bootloader which can upload hex code through their serial port.
while others like AT89S51/AT89S52 may require dedicated programmers that upload the code to the microcontroller using the SPI pins of the 8051 variant.
Tags
- Log in to post comments