
A short tutorial on how to setup a serial port communication between a Linux PC/Laptop and a AVR/PIC/MSP430 Microcontroller or Arduino using pySerial and Python.


The Tutorial deals with
- Setting up permissions to read and write to a Linux serial port,
- How to solve the /dev/ttyUSB0 or /dev/ttyACM0 access denied error.
- How to add a user to tty and dialout groups.
- How to solve dmesg :read kernel buffer failed :Operation not permitted error
Please note that this tutorial is Linux specific .
Refer
Contents
- Source codes
- Installing Pyserial on Linux using pip
- Serial Port naming system on Linux
- Serial Ports permissions under Linux
- Adding a user to tty and dialout groups
- Opening the serial port on Linux using Python
- Receiving data from Arduino/ Microcontroller using Python on Linux
- References
Source codes
Please use
[user@localhost]$ python3 _No_PythonCodes_in_Repo.pyto run the codes in repo on Linux systems.
Most of the codes do not have a #!/bin/python3 header.
Please note that the source codes on the website show only the relevant sections to highlight the process of programming the serial port.
Please use the complete source codes from our github repo when building your own program.
Hardware Used
If you want to communicate with a bare microcontroller like ATmega32,ATmega32p,ESP32,Raspberry Pi Pico, MSP430 using Python ,You will need a USB to serial converter like USB2SERIAL.

Installing pySerial on Linux
On most Linux distro's python is installed by default. Here I am using Ubuntu 20.04 LTS version and pySerial is not installed by default in my system.
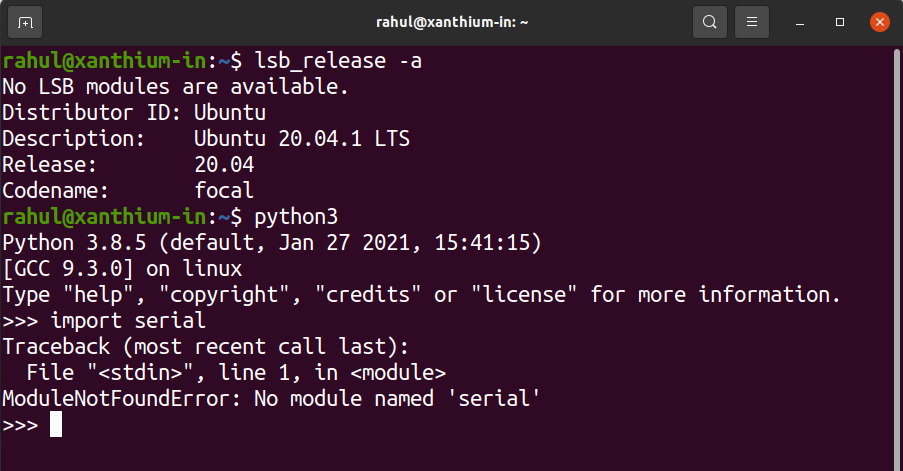
First install pip3 for your Linux version using the appropriate package manager
- You can then install Pyserial by using the pip command as shown below.
sudo python3 -m pip3 install pyserial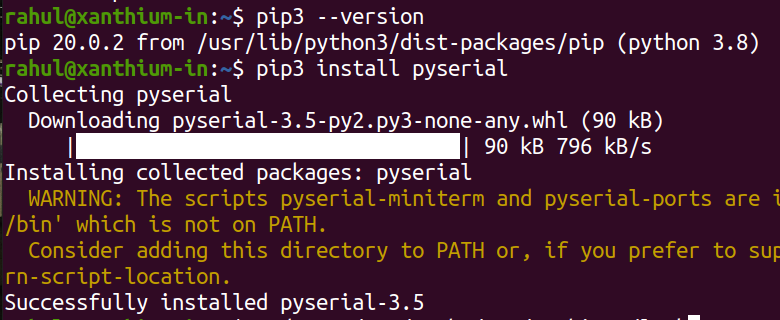
Serial Port naming convention on Linux,
In Linux there is no concept of COM number, instead the
- hardware serial ports are numbered as ttyS0,ttyS1 etc ,
- USB to Serial Converters as ttyUSB0,ttyUSB1 etc.
- Arduino's as ttyACM0
You can know more about finding the serial port number here.
Connect your Arduino to the USB port and issue a
sudo dmesg | tailcommand at the terminal.
You have to use sudo in front of dmesg otherwise you will get a dmesg :read kernel buffer failed :Operation not permitted error.

Here Arduino is identified as ttyACM0 on Ubuntu
For USB to Serial converters like USB2SERIAL,
You can connect them to your USB port and issue a “ sudo dmesg | tail” command at the terminal.

So in Linux change the second line to
SerialObj = serial.Serial('/dev/ttyUSB0')for USB to serial Converters or
SerialObj = serial.Serial('/dev/ttyACM0')for Arduino
Serial Port Permissions under Linux
On most Linux system access to serial ports (USB based Virtual Serial Port or Hardware Ports) are restricted due to security reasons.
If you tried to access the serial port you will get a ttyUSB0 or ttyACM0 access denied error.
On Linux to access the serial port the user must be part of 2 groups
- tty
- dialout
You should add yourself to these two groups using the usermod command.
Please note that you should have permission to run the sudo command (part of the Sudo group in Ubuntu) or part of the wheel group in Centos/RHEL/Rocky Linux.
Adding a user to tty and dialout groups for serial port access.
sudo usermod -a -G tty [username]
sudo usermod -a -G dialout [username]
replace [username] with your username Eg rahul or molly.
The -a makes sure that you are appending the user to the groups .
if -a is missing you will get unsubscribed from all other groups except tty and dialout.
After the commands are run,
Logoff from your account and then log back in so that changes are saved.
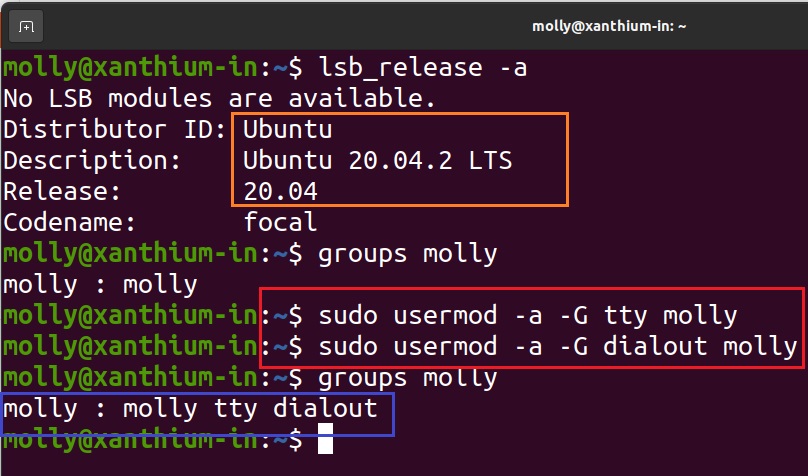
Adding the user molly to dialout and tty groups on Ubuntu 20.04 LTS (Debian based)
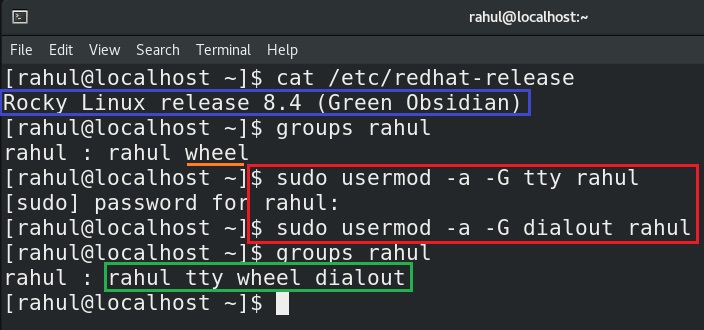
Adding the user rahul to dialout and tty groups on Rocky Linux (Centos/RHEL/Fedora derivative)
Make sure to Log off after running the commands.
Opening a serial port on Linux using Python
To test whether our commands have worked, we will write a small code to open a serial port connection.
#!/bin/python3

import serial

SerialPortObj = serial.Serial('/dev/ttyUSB0')
print('\nStatus -> ',SerialPortObj)

SerialPortObj.close()
This the bare minimum required to open the connection.
On our Repo you will find a similar file called "SerTest.py" which has a little bit more bells and whistles than the one shown above. I will be using that in the screenshots posted below.
Replace /dev/ttyUSB0 with your serial port number.
Make the script executable by using chmod command.
chmod +x your_python_file.py and then run it.
if the script is successful ,properties of your serial port will be printed on the terminal.
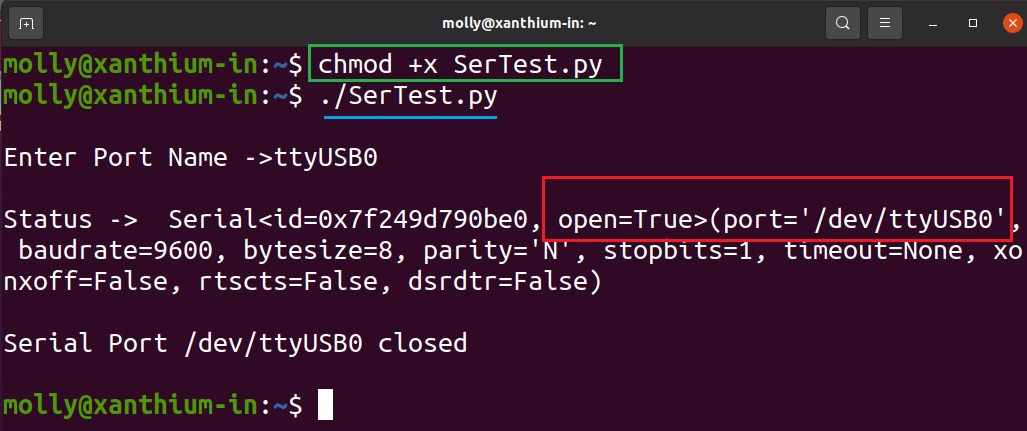
Code running on ubuntu 20.04 LTS
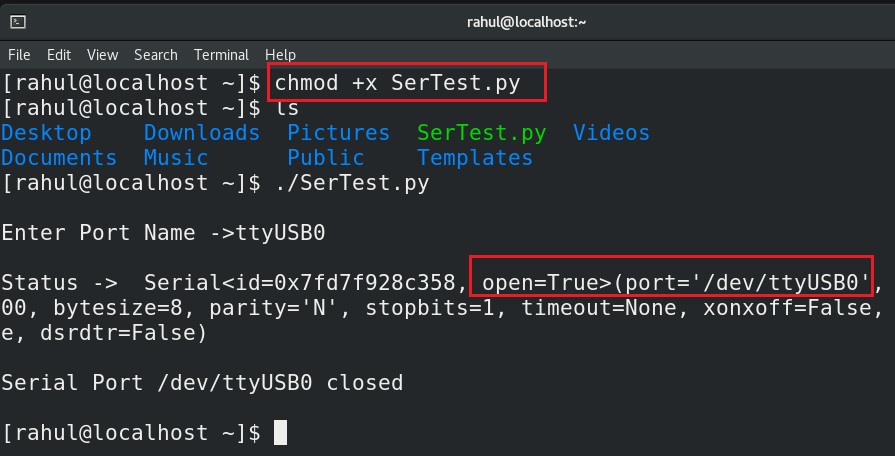
Code running on Rocky Linux 8.
Receiving data from Arduino/ Microcontroller
Here we will receive string send by the arduino using a python script and display it on the screen.
The Arduino code and full python code are in the repo.
Replace /dev/ttyUSB0 with your serial port number.
Make the script executable by using chmod command.
Execute the script using the below command.
python3 _5_PySerial-Receive_String.py
The file _5_PySerial-Receive_String.py does not have the #!/bin/python3 header so we have to explicitly specify to use python3 as shown above.

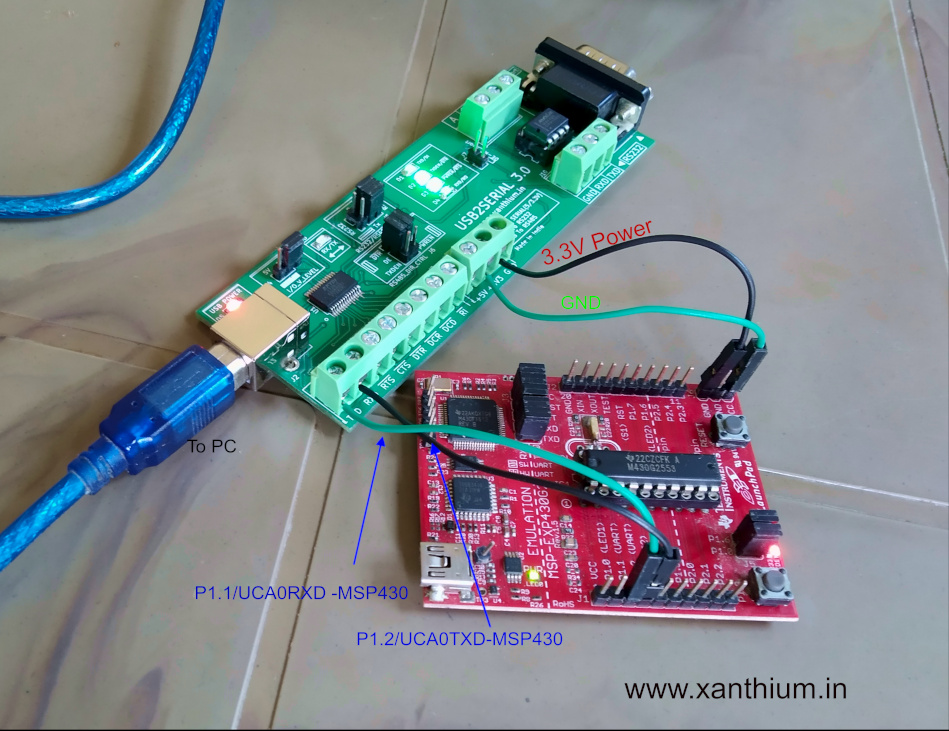
The below block diagram shows how to interface any microcontroller to a PC with a standard USB to serial converter.

Here the TXD of the serial port is connected to the RXD of the microcontroller UART and vice versa. So when microcontroller transmits a byte it goes to the receive buffer of the serial port on the PC side and vice versa.
Ground lines are made common to both PC and microcontroller.
You have to use a USB to Serial Converter chip like FT232RL or buy a standard USB to serial converter board like USB2SERIAL to convert serial signals to the USB ones.
References
- Log in to post comments
