
In this tutorial,
We will learn how to read and write bytes, characters, text strings ,floats,doubles and other multi byte data structures like structs to the internal EEPROM memory of the Arduino Development board (ATmega328P) using the EEPROM library available in the Arduino IDE.
Contents
- Introduction
- Source Codes
- Arduino EEPROM Structure
- Finding out Arduino EEPROM length
- Storing a byte in Arduino EEPROM
- Storing a Text String in Arduino EEPROM
- Storing a float/double value in Arduino EEPROM
- Storing a struct in Arduino EEPROM
Introduction
EEPROM on the Arduino boards has a size range from 1024 bytes on Arduino UNO to 4096 bytes on the Arduino Mega board.
They are useful for storing small amounts of data like serial numbers, calibration values, unique identifiers etc.
Warning!
When using the EEPROM, we should be mindful to the fact they have a limited write /erase endurance cycle of about 100,000 operations. Repeatedly writing and erasing to the same byte location may wear out the memory cell at that location. |
Here we will concentrate on code instead of the architecture of the EEPROM.
The code used here is applicable across various Arduino boards that uses the Microchip AVR ATmega Microcontrollers.
| Board Name | Microcontroller | EEPROM size in bytes |
| Arduino UNO | ATmega328P | 1024 bytes |
| Arduino Nano | ATmega328P | 1024 bytes |
| Arduino Mega2560 | ATmega2560 | 4096 bytes |
| Arduino Micro | ATmega32U4 | 1024 bytes |
| Arduino Leonardo | ATmega32u4 | 1024 bytes |
Source Codes

- Download the Arduino Internal EEPROM Programming Code as Zip file
- Browse Github Repo
- Please note that ,Code displayed on this webpage may be partial.
- Use the Above Link to download the full code for storing characters ,strings, bytes, floats, doubles and structs to internal EEPROM of Arduino
Arduino UNO internal EEPROM programming
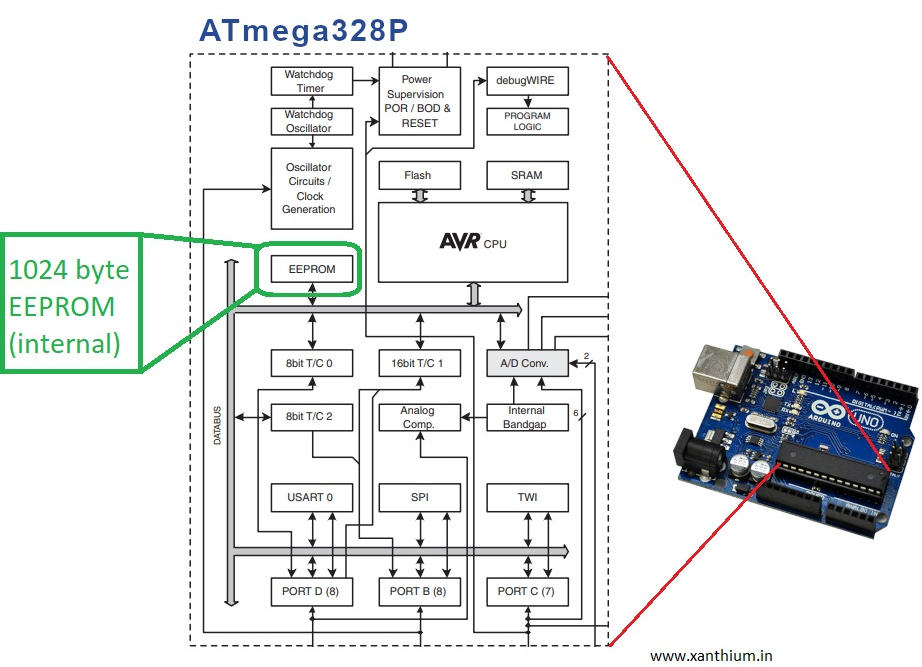
Here, I will be using Arduino UNO board which uses the ATmega328P microcontroller to illustrate the read write capabilities of the internal EEPROM . The ATmega328P has 1024 bytes of internal EEPROM, which means that we can store 1024 eight bit data on it .
Logical structure of the EEPROM is shown below.
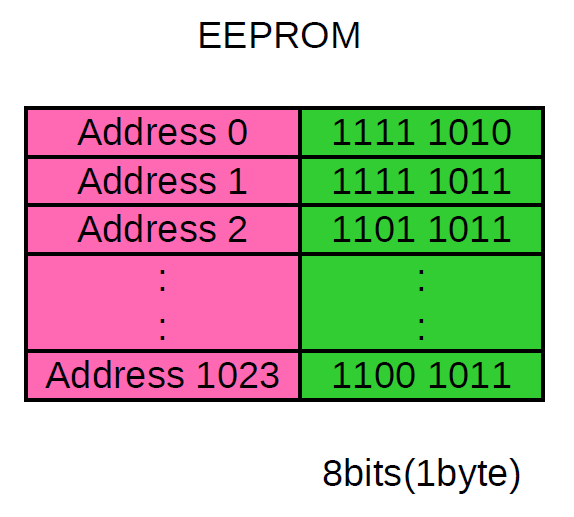
There are 1024 memory cells (Green Cells) and each can store a 8 bit binary data(a byte) .
We can access the specific memory location using addresses which are numbered from 0 to1023.
Each memory location can store a decimal number from 0 - 255 or a 8 bit ASCII character like 'A'.
The default value of an unmodified EEPROM memory location is 255.
Arduino EEPROM Library
To access the EEPROM functions you have to call the EEPROM library from your Arduino IDE as shown below.
#include <EEPROM.h> // Library for accessing internal EEPROM
void setup() {}
void loop(){}
Finding out the size of EEPROM on Arduino
To measure the size of your EEPROM in your Arduino board you can use the function EEPROM.length() which returns the size in the form of an unsigned int
The below program displays the number of bytes available
#include <EEPROM.h> // Library for accessing internal EEPROM
void setup()
{
   Serial.begin(9600); //to send data to serial monitor

   unsigned int EEPROM_Size = 0;  // Variable to get the number of eeprom locations

   EEPROM_Size = EEPROM.length(); //Get the total number of bytes on the eeprom

   Serial.print(EEPROM_Size); //The length will be send to the serial monitor
}
If you run this code ,
- On Arduino UNO it will return 1024
- and on Arduino Mega you will get 4096.
The length of the EEPROM will be send to the serial monitor of the Arduino IDE by the Connected Arduino board.
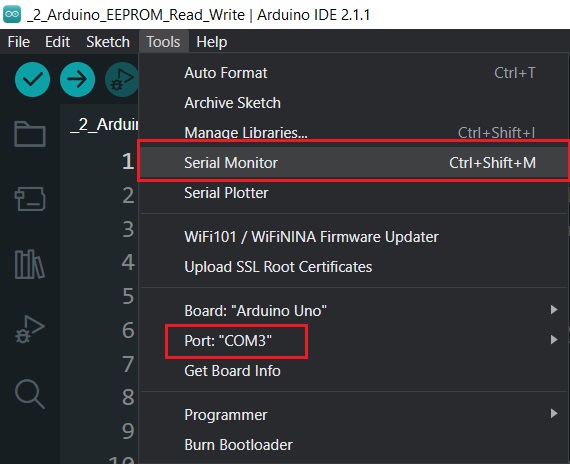
Make sure that you use the correct COM port number.(COM3 may be different on your system)
Size of the EEPROM is then printed on the Serial Monitor as shown below.

Writing and Reading a Byte to the Arduino EEPROM
EEPROM.write() is used to write a byte to a specific memory location.
EEPROM.write(EEPROM_location_address,value_to_write);The value has to be a byte so numbers from 0-255 or 8bit ASCII characters.
Write() function takes around 3.3ms to complete which the user should be aware.
Please note that voltage to the processor should not swing significantly while a write operation is taking place.
#include <EEPROM.h> // Library for accessing internal EEPROM
void setup()
 {
  Serial.begin(9600); //to send data to serial monitor

  int EEPROM_location_address = 0;
  int value_to_write = 25;
  int value;
  EEPROM.write(EEPROM_location_address,value_to_write);
  value = EEPROM.read(EEPROM_location_address);
  Serial.println();
  Serial.print("EEPROM location = "); Serial.print(EEPROM_location_address); Serial.print(" Data = "); Serial.print(value);
}
void loop()
In the above code ,the 25 is written to memory location 0 and read back again. The output can be seen on the serial monitor as shown below.

EEPROM.read() function is used to read back the value from a specified memory location.
Syntax below
int returned_value ;
returned_value =  EEPROM.read(address_location_to_read);
When you do a read call to locations that have never been written, EEPROM.read() will return the value 255.
EEPROM.update()
EEPROM.update(address, value)is another function that writes to the location only if the value is different from what it is given to write.
This function prevents unnecessary writes to the EEPROM memory cell ,thus prolonging its lifespan.
Storing a Text String in Arduino EEPROM
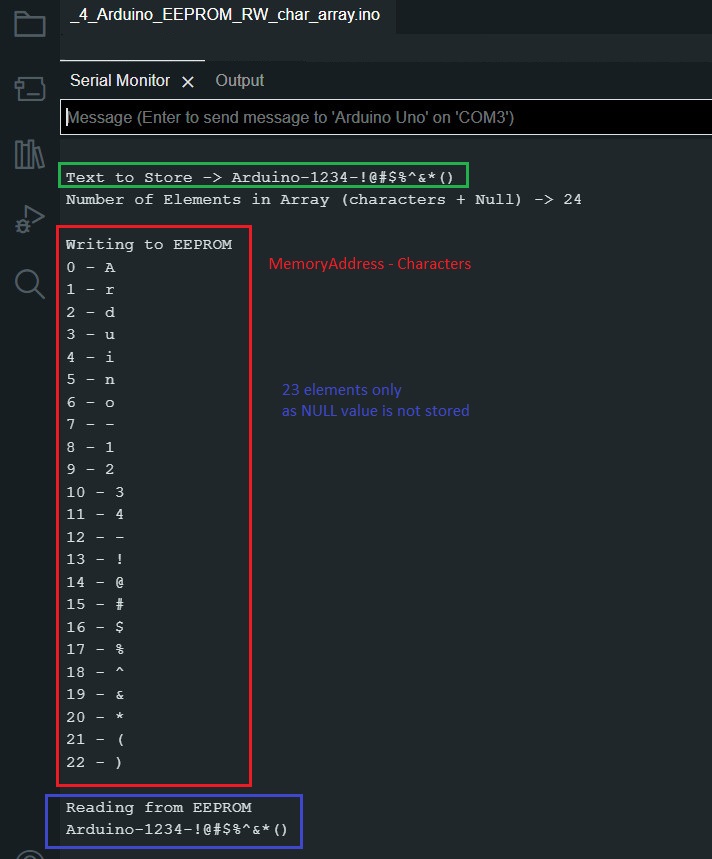
Here we will store a text string consisting of ASCII characters (8bit) to the EEPROM of Arduino. The string will consist of Numbers, alphabets and special characters.
The string we will writing into the Arduino EEPROM is stored in a char array. Please note that the char array is terminated by a NULL '\0' character.
char Text[] = {"Arduino-1234-!@#$%^&*()"};//String Array terminated by \0 nullHere we can calculate the number of elements in the array using C languages sizeof() operator.
int array_length = sizeof(Text)/sizeof(char); //Calculate the Number of elements in the ArrayWe will then store the characters of the string in successive memory locations using a while loop except the NULL terminator. Full code is available on our GitHub.
 //Full code  _4_Arduino_EEPROM_RW_char_array.ino

 while (Text[i] !='\0' )
 {
   EEPROM.write(i,Text[i]);//write the array to EEPROM except /0 null terminator
   Serial.print(i);
   Serial.print(" - ");
   Serial.print(Text[i]);
   Serial.println();
   i++;
 }
After which we will read back the stored string using EEPROM.read() and a for loop
for(i=0; i<(array_length-1); i++) //array_length-1 because we are not storing null
 {
   Serial.print(char(EEPROM.read(i)));//char is used for casting binary to char
 }
The output of the code is shown below.
Storing a float or double value in a EEPROM of Arduino
In the previous example we were writing bytes to memory locations on the internal EEPROM.
Lets say you want to store values that are bigger than a byte (8bit) like a float(4bytes) or double (4bytes) to the internal EEPROM of the Arduino board.
Arduino library provides 2 functions that would let you read and write datatypes that are larger than a byte to the EEPROM.
The two functions are
- EEPROM.put()
- EEPROM.get()
The below code shows how to store a float value to the Arduino EEPROM
#include <EEPROM.h> // Library for accessing internal EEPROM
void setup()
{
    Serial.begin(9600); //to send data to serial monitor
    float float_value_1 = 24.56;  // float value to write to EEPROM (2 bytes)
    float read_value = 0.0;

    int EEPROM_address_1 = 4;     // Address of the location

   EEPROM.put(EEPROM_address_1, float_value_1); // write the float value to EEPROM

   read_value = EEPROM.get(EEPROM_address_1, float_value_1); //retrieve the value EEPROM

   Serial.print("Float Value    - ");Serial.print(float_value_1);
   Serial.print(" Stored at addr ");Serial.println(EEPROM_address_1);
   Serial.print("Data read Back - ");
   Serial.println((read_value));
}
void loop()
{
  // put your main code here, to run repeatedly:
}
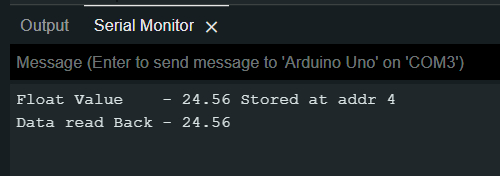
Here we store the value 24.56 to the EEPROM location 4 of the internal Arduino EEPROM
using the EEPROM.put() function and then retrieve the stored value using the EEPROM.get() function.
The syntax of the EEPROM.put() is shown below
EEPROM.put(EEPROM_address_to_write, variable_name); // write the float value to EEPROMIt takes two arguments,
the starting address at which the variable (EEPROM_address) is stored and the name of the variable (variable_name).
The function then writes the required bytes to your EEPROM using EEPROM.update() function internally.
To read the float value from the Arduino EEPROM, we use the EEPROM.get() function which returns a multibyte value.
Syntax is shown below
returned_value = EEPROM.get(EEPROM_address_to_read, variable_name);//read from EEPROMif you are reading a float value from EEPROM, returned_value must be declared as float.
Storing multiple float/double values in Arduino EEPROM
Here, We will Learn how to store multiple Float values with decimal points on the Arduino's internal EEPROM sequentially. This can be used for storing temperature or humidity values with more precision on the Arduino for data logging applications.
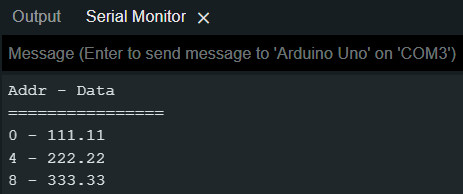
We will store 3 float values to the Arduino EEPROM memory sequentially. The float values have a size of 4 bytes each which we have to consider while writing into the EEPROM of Arduino.The data will be stored in the EEPROM as shown below.

The float values are the following
 float float_value_1 = 111.11;
 float float_value_2 = 222.22;
 float float_value_3 = 333.33;
In order to find the size of each float we can use the sizeof() operator available in the C language as shown below.
Full code is available on GitHub (link above)
 int EEPROM_address_1 = 0;                 // start address = 0
 int EEPROM_address_2 = sizeof(float);     // start address = 4
 int EEPROM_address_3 = (sizeof(float)*2); // start address = 8
After which we can use the EEPROM.put() to write the float/double values to the EEPROM
 EEPROM.put(EEPROM_address_1, float_value_1);//store the float value 111.11 at address = 0
 EEPROM.put(EEPROM_address_2, float_value_2);//store the float value 222.22 at address = 4
 EEPROM.put(EEPROM_address_3, float_value_3);//store the float value 333.33 at address = 8
The Output can be seen below.
Storing a multi byte struct datatype on Arduino EEPROM
Some times we may need a composite data type that groups together variables of different data types under a single name. This allows you to create a record-like structure in memory where you can store related information, For that purpose we can use a struct.
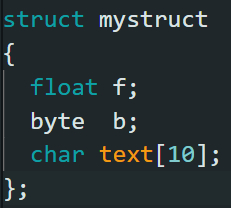
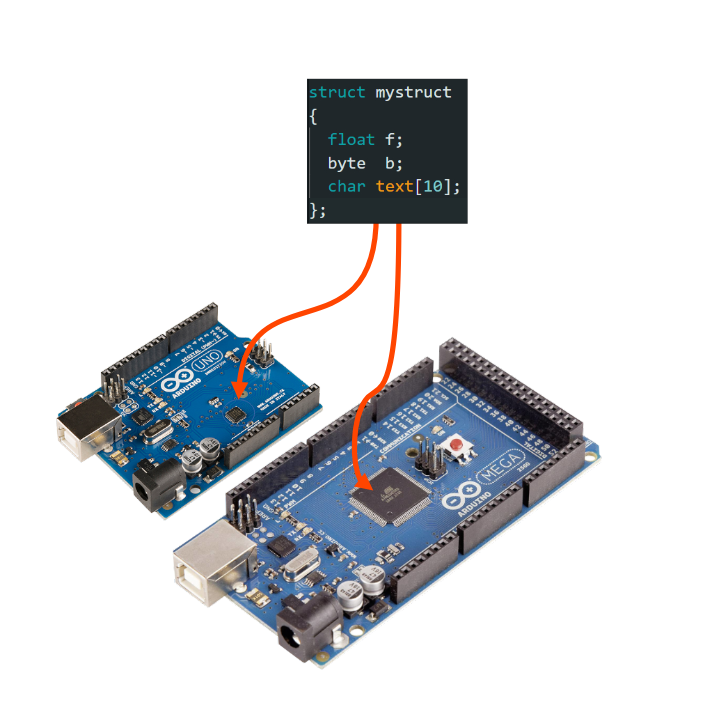
Here we will learn how to store a struct variable of the type shown above to the EEPROM of a Arduino UNO.
First thing is to create a struct
struct mystruct
{
 float f;        //float variables
 byte  b;         // 8-bit unsigned number, from 0 to 255
 char text[10];
};
Then declare two variables of the type struct and populate the individual members as shown below.
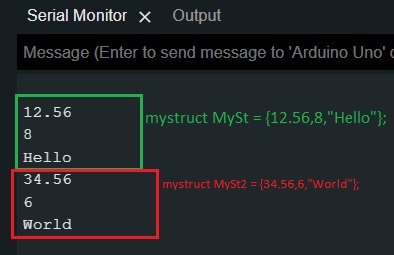
mystruct MySt = {12.56,8,"Hello"};
mystruct MySt2 = {34.56,6,"World"};
You can then find out the starting address at which to store the two structs.
int EEPROM_address  = 0;//
int EEPROM_address2 = sizeof(MySt);
You can then write the data using EEPROM.put()
EEPROM.put(EEPROM_address, MySt);//store the structure MySt
EEPROM.put(EEPROM_address2, MySt2);//store the structure MySt2
The data can be read out using EEPROM.get()
 EEPROM.get(EEPROM_address, MySt);
 EEPROM.get(EEPROM_address2, MySt2);

 Serial.println(MySt.f);
 Serial.println(MySt.b);
 Serial.println(MySt.text);

 Serial.println(MySt2.f);
 Serial.println(MySt2.b);
 Serial.println(MySt2.text);
The output from serial monitor
- Log in to post comments
