
In this tutorial, you will learn to program the Serial Port (USB Virtual COM port) of a Windows PC using C# (Csharp) on the .NET platform.
Here we will create a simple C# program that will transmit and receive data to an Arduino connected to your PC's Virtual COM Port (SerialPort) using C# language.
This tutorial is aimed at beginners who wants to learn how to interface embedded system like Arduino boards, USB Data Acquisition Systems etc. to a Windows PC Serial Port using C# language.
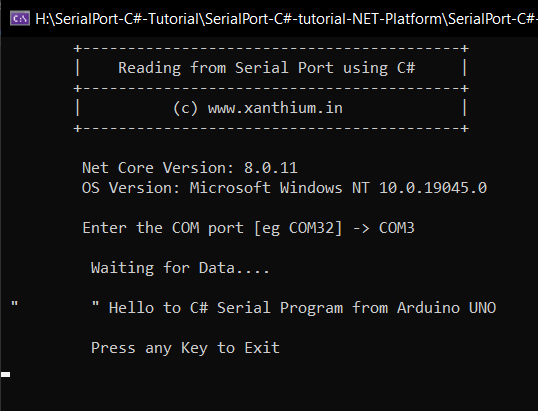
Source Codes for our C# serial port programming code is available on GitHub under opensource license (link below).
The codes in the tutorial supports both
- the latest .NET Platform (.NET Core 3.x to .NET 7, .NET 8 )
- and the legacy .NET framework Versions 4.5/4.8
Contents
- Source Codes
- IDE's used
- Creating a Visual Studio Project for Serial Comm
- Installing System.IO.Ports Namespace
- Hardware Connections between Arduino & PC
- Connecting a Bare Microcontroller with a PC
- Displaying available Serial Ports
- Opening a Serial Port Connection
- Setting up Baud Rate, Parity, Data Bits and Stop bits
- Setting up Parity Bit
- Setting up Data Bits
- Setting up Stop Bits
- Opening and Closing Serial Port
- Setting up Baud Rate, Parity, Data Bits and Stop bits
- Solve Arduino Misbehaving while Opening Serial Port
- Configuring the Port using SerialPort () Constructor
- Serial Port Exceptions in C#
- Reading from PC Serial Port using C#
- Clearing the Transmit/Receive Buffer
- Arduino to PC Serial Communication in C#
- Arduino Transmit Code
- C# Serial Port Reception Code
- Setting up Serial Port Read timeouts in C#
- Writing data to the Serial Port using C#
- PC to Arduino duplex Serial Communication in C#
- C# PC side Serial Transmission Code
- Arduino Side Echo Back Code
- PC to Arduino duplex Serial Communication in C#
- Supported Microcontrollers
- Controlling the RTS and DTR pins of Serial Port using C#
Source Codes
All the C# source codes for serial communication can be downloaded from our GitHub repo using the below links
Download Serial Port Programming using C# Source Codes as Zip File
Browse Serial Port Programming using C# Source Codes on GitHub
IDE's used

Here we will be using Visual Studio Community edition to code our C# part
and Arduino IDE to write our Microcontroller side code in Arduino C .
Both can be downloaded from their respective website's free of charge.
You can also use the cross platform .NET SDK CLI to code the C# section too. If you are new to .NET SDK CLI edition do check our tutorial.
Creating a Visual Studio Project
With the release of the Open source Cross platform .NET Platform framework which contains the following versions .NET Core 3.x,.NET 5,to .NET 8,.NET 9 it becomes possible to support cross platform applications that runs on Linux and Mac OS X. Now we can use the same code base to create serial port applications that run on Windows ,Linux and MacOS X provided you do not use the WinForms or WPF GUI elements.
The Legacy .NET Framework still exists alongside with the modern .NET Platform on your Windows PC and is possible to create applications that use the Legacy .NET framework.
This is reflected in the project types provided by the Visual Studio Which allows you to create a
a .NET Platform Project that targets the latest .NET version (eg .NET 8 or .NET9)
a Legacy .NET Framework Project that targets .NET Framework 4.7/4.8 versions
Here we will teach you to create both project types and explain the subtle difference between them.
When we open the "Create Project Dialogue "in the Visual Studio You will be presented with two project options as shown below. Do adjust the filters at the top to C#, Windows, Console
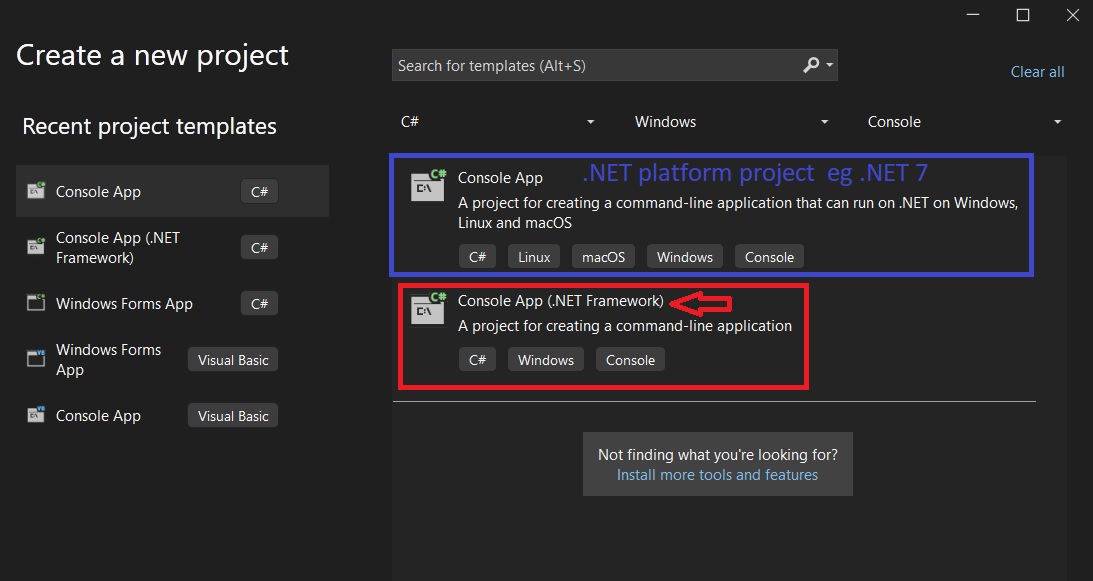
The top one high lighted in Blue is the Cross platform .NET Platform Project while the one below in Red is the Legacy .NET framework version.
Creating a legacy .NET framework Serial Port Project
To create a legacy C# Serial Port Project that targets the .NET Framework ,Select the Project type high lighted in RED, Console App(.NET Framework) in the above image⇑.
This will bring up the Configure Page shown below.
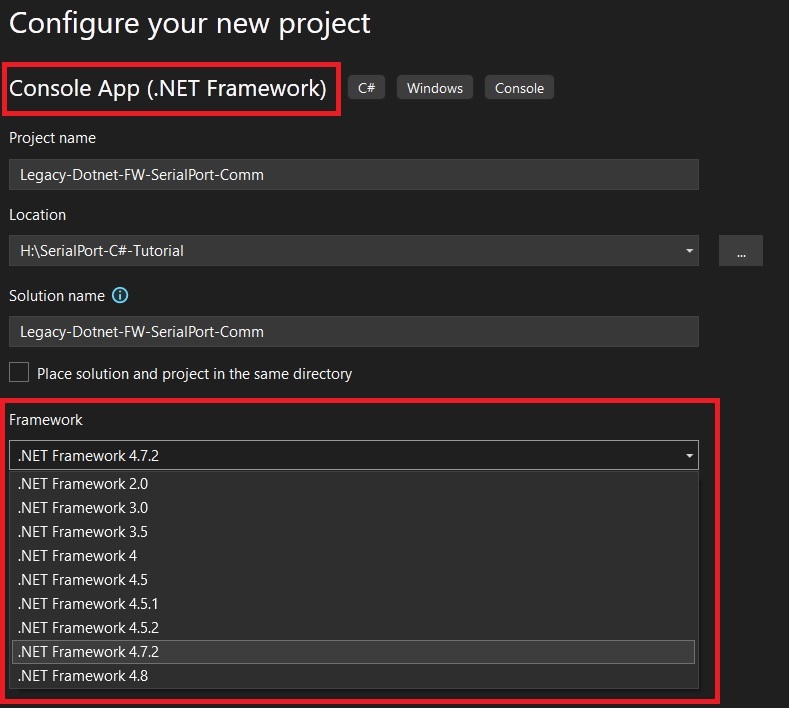
Here you can select .NET framework version your Program wants to use under framework. You can complete the setup and start programming.
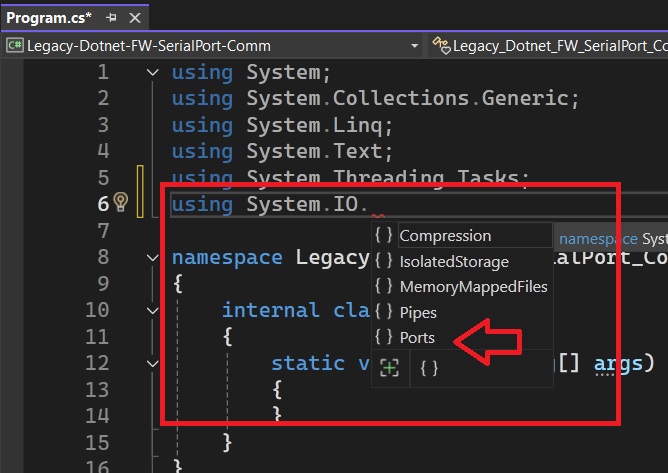
Since we are using the .NET framework that already is installed by default on all Windows PC's ( Windows 10,Windows 11), there is no need to install the System.IO.Ports namespace using Nuget Package manager.
You can just include the reference and start programming as shown in the below image.
Creating a Cross platform .NET Platform COM Port Project
To develop for the cross platform .NET Platform select the the project type high lighted in the below image.

Then in the Additional information dialogue select the .NET version you want to use, below image.
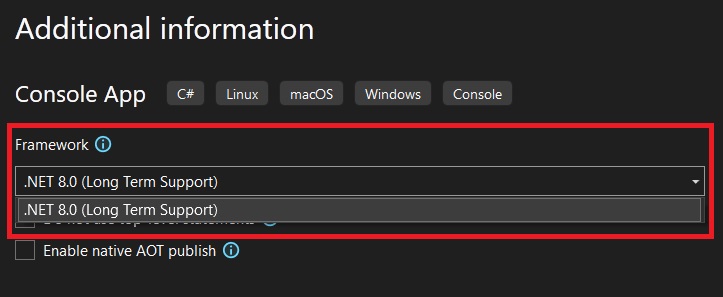
Please note that in this .NET project type, System.IO.Ports is not available by default .
You will have to install the package using NuGet Package manager as shown in the section below.
Installing System.IO.Ports Namespace
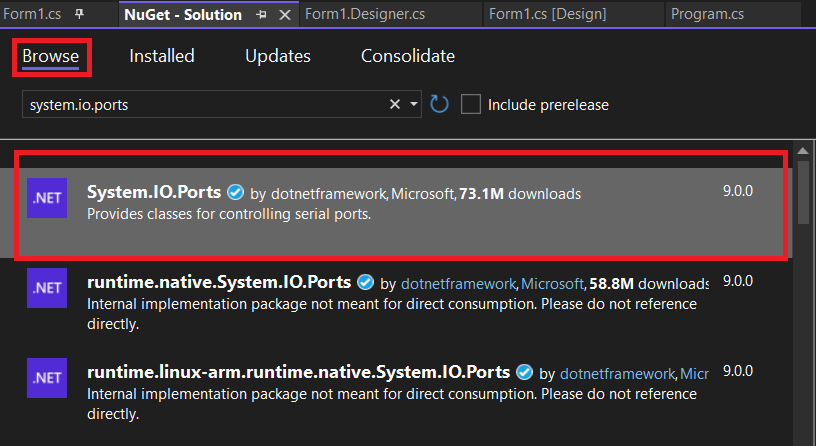
To access the classes and properties needed for accessing the serial port device using the .NET platform, we need to install the System.IO.Ports namespace.
System.IO.Ports contains classes for accessing and controlling serial ports. The class SerialPort provides a framework for synchronous and event-driven I/O, access to pin and break states of the virtual serial port.
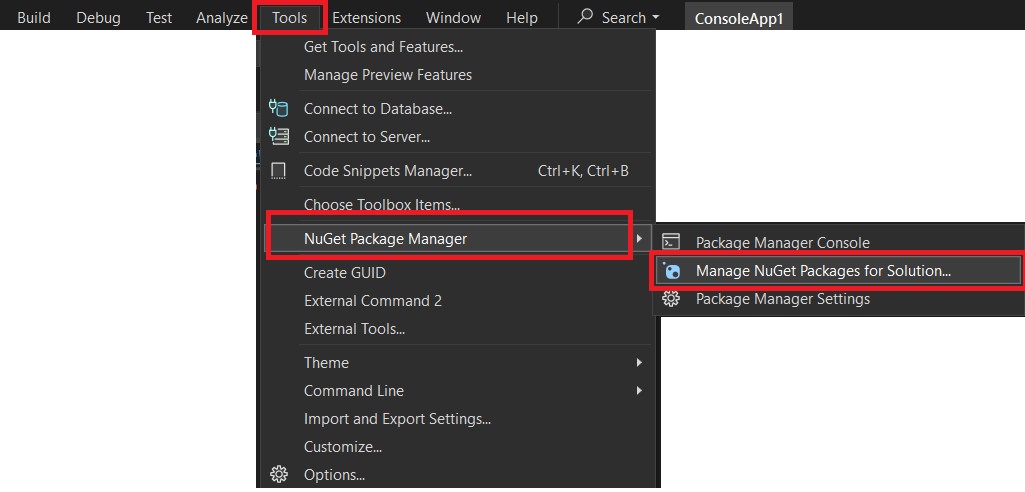
We can use the NuGet Package Manager present in the Visual Studio Community Edition IDE to install the System.IO.Ports namespace.
You can find it under Tools -> "Nuget Package Manager" ->"Manage NuGet Packages for Solution" as shown below
.NET SDK CLI users
If you are using the .NET SDK Command line tools you can install the System.IO.Ports namespace by issuing the following command inside your project folder.
dotnet add package System.IO.Ports this will install the latest stable version of the library.
Hardware Connections between Arduino & PC
Here we are going to demonstrate a Serial Communication between an embedded device like Arduino and a Windows PC using Serial Port (COM port).Our C# Code, running on the Windows PC will read and write data to the attached serial port using API's provided by the SerialPort class of the System.IO.Ports namespace.
Basic hardware connections for serial communication between PC and Arduino UNO are shown below.
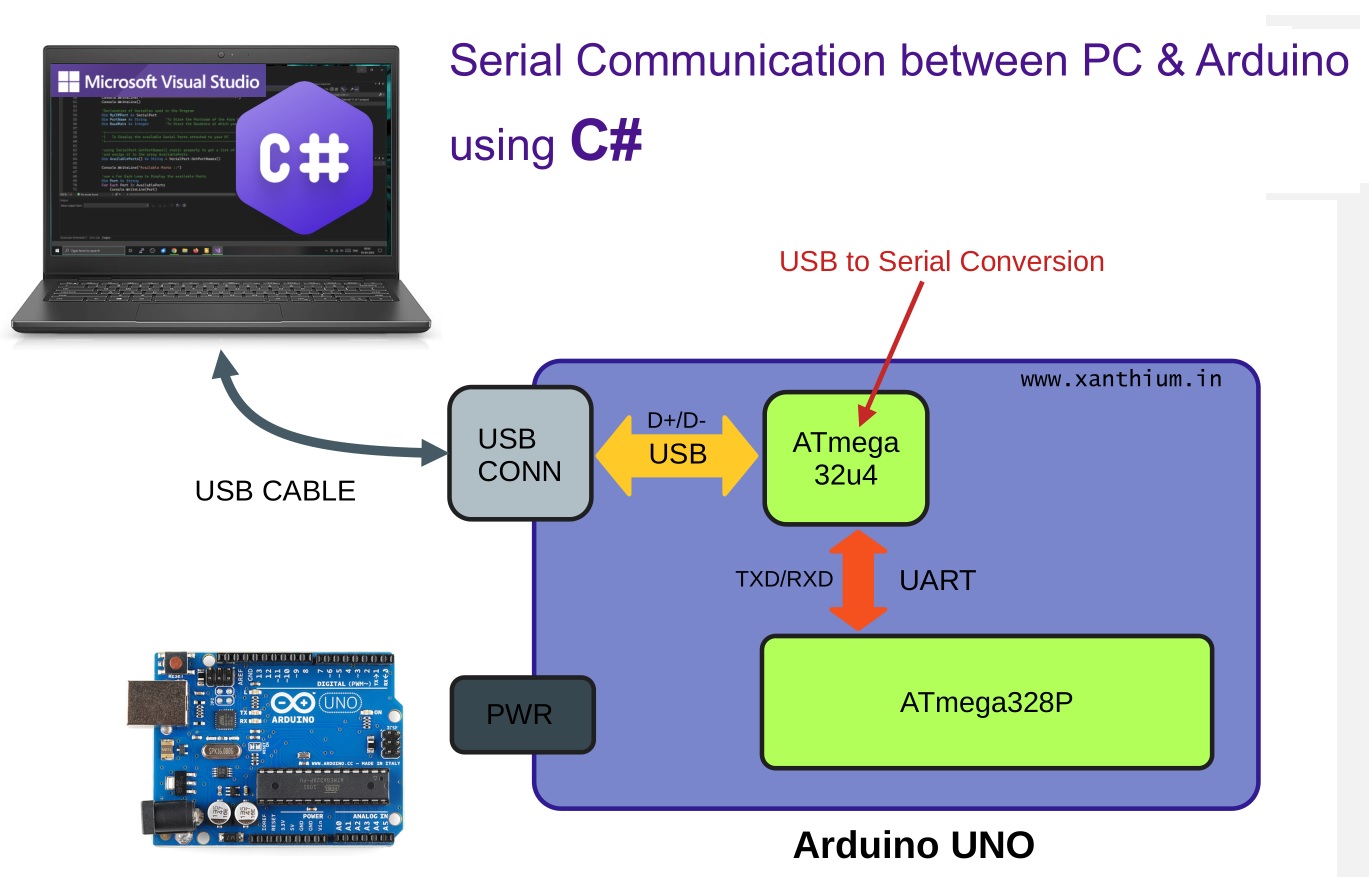
Here the serial signal lines TX and RX from the microcontroller ATmega328P are connected to a ATmega32u4 microcontroller which acts as a USB to serial Converter.
Arduino USB port is connected to the PC's USB port .The USB signals send by the Arduino are then received by a Virtual Serial Port (Virtual COM Port ) driver inside the Windows PC.
Our C# Code communicates with that Virtual Serial Port and the data is displayed on the console.
Identifying COM Port Number on Windows
Arduino presents itself as a Virtual COM port to the Windows PC .
if you connect the Arduino to the PC and check under Ports in the Device Manager of our PC. You can find the COM port number corresponding to your Arduino.
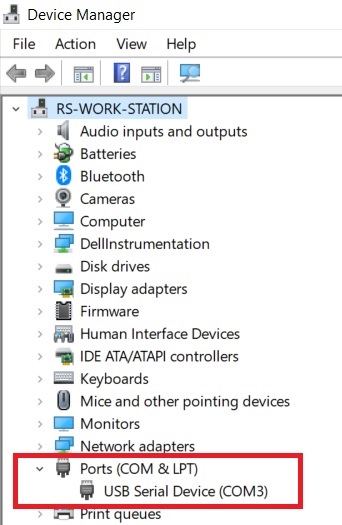
Here the COM port number is shown as COM3.This number may be different in your PC
Connecting a Bare Microcontroller with a PC using C#
In the above example, we were using an Arduino with a built in USB Controller (ATmega32u4).
As an embedded engineer you may have to interface with microcontrollers that don't have any built in USB controller like 8051,ATmega32,MSP430G2553 etc.
In that case we may have to use a USB to Serial Converter device like the one shown below.
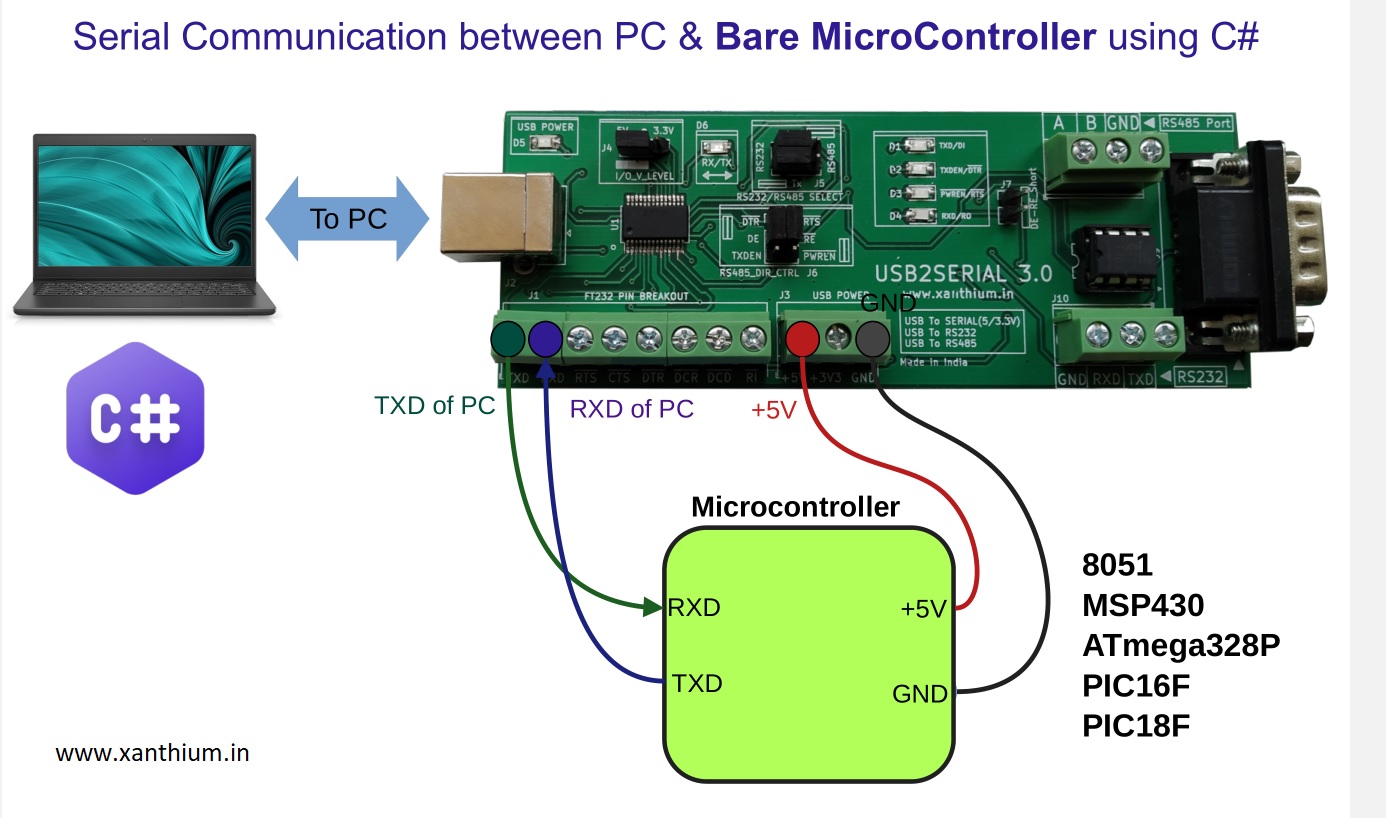
Here we are connecting the TX and RX pins of the Microcontroller to the RX and TX pins of the FT232 chip as shown in the above image.So data sent by the Microcontroller is transmitted to the PC .
Here we are using the USB2SERIAL (USB to Serial/RS232/RS485 Converter) which is based on the popular FTDI FT232RL chip.
The Converter we are using is well supported under Windows, Linux and Mac OSX.
The USB2SERIAL can function as a USB to Serial converter with selectable logic voltage levels 5V and 3.3V for connecting to both 3V (Eg MSP430G2553) and 5V logic level microcontrollers (Eg ATmega328P).
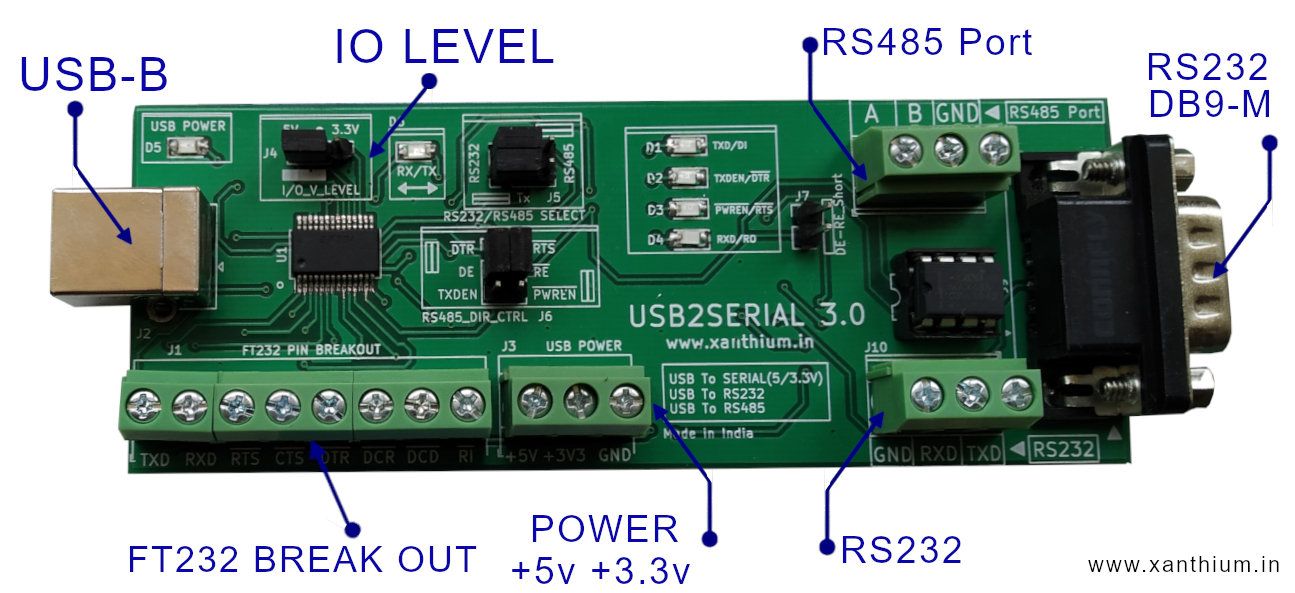
The USB2SERIAL converter can also be used as a USB to RS485 Converter to interface with RS485 enabled devices.
It can also be configured as a USB to To RS232 converter to communicate with legacy RS232 enabled devices.
Displaying available Serial Ports
When you are developing a C# application that needs to use the Serial Port (COM port for the Windows Users),it is convenient to get the name of the available serial ports in your system programmatically without looking up on the Device Manager.
The System.IO.Ports namespace provides a static method called GetPortNames() which returns the available serial ports on a computer. This method can be used to populate a drop down list with available serial ports when you are building a GUI app.
Here we will create a simple program that shows the available COM ports on a Windows 10/11 system. Make sure that System.IO.Ports namespace is installed for your Visual Studio Project.
The Partial Code is shown below. Full code available on GitHub repo.
//Partial code display available Serial Ports in a PC using C#
String[] AvailableSerialPorts = SerialPort.GetPortNames(); // static method to get all the available serial ports on a system
Console.WriteLine("Available COM Ports on Windows\n");
foreach (String COMPort in AvailableSerialPorts)
{
  Console.WriteLine(COMPort);
}
Here we create a String array which receives names of COM Ports from the static Method SerialPort.GetPortNames();. Since this is a static method there is no need to create a serial port object.
The Port names are then displayed using a foreach loop on Console.
Here I have two Serial Port device's (Virtual COM Port) connected to my USB Ports as seen on the Device Manager.
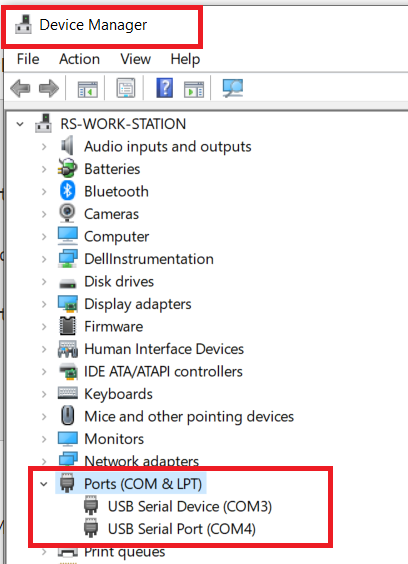
On Running the above code.

Opening a Serial Port Connection using C#
To open a connection to a COM port or Serial Port using C# we have to instantiate a serial port object using the SerialPort class provided by the .NET Environment.
This can be done by the following code.
SerialPort COMPort = new SerialPort();Once the SerialPort object COMPort is created ,We can then assign the required properties like port number, Baud Rate, Number of Stop Bits ,Parity, Number of Stop Bits etc.
First thing we are going to do is to assign a valid port number to our SerialPort Object.
This can be done easily using the .PortName property which accepts a valid string of the type COMxx (Eg COM21).
COMPort.PortName = "COM3"; //Here COM3 is the serialport number in my systemHere COM3 is the serial port number in my system, it may be different in other systems.
Setting up BaudRate, Parity ,Data bits and Stop bits

A basic serial communication between two devices have to agree on the following parameters for a successful data transfer .
They are
- Baud Rate
- Parity
- Data Bits
- Stop Bits
So we have to setup that in our C# program to successfully communicate with the Arduino.
Most commonly used setting is 9600 8N1 which means baud rate =9600,8 databits, No Parity, One Stop bit
Here standard baud rates are 1200,2400,4800, 9600, 19200, 38400, 57600, 115200, 230400.
You can configure the baud rate in your C# serial port program using the following line
COMPort.BaudRate = 9600; //any of the above legal values can be usedSetting up Parity Bit
A C# .NET serial port program supports the following parities EVEN,ODD,NONE,MARK and SPACE.
Intellisense will show, all the available parities as shown below.
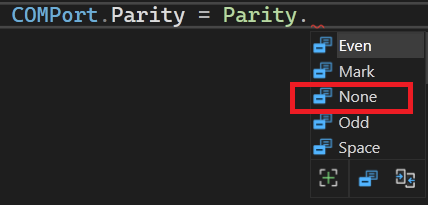
For most applications we will be using a NONE parity.
Usually this values depend upon the device to which you will be communicating, So read the datasheet for setting up the correct parity.
So our code will be
COMPort.Parity = Parity.None; //NO Parity bitsSetting up Data Bits in C#
Data bits is the number of bits used to represent a single character that is send through the serial line. The Databits can be 8 bit wide or 9 bits wide.
Most commonly used is 8 bits .So
COMPort.DataBits = 8;Setting up Stop Bits in C#
Number of Stop bits can be ONE or TWO.
Most commonly used is ONE. You can set it up using the StopBits enum

COMPort.StopBits = StopBits.One; //One stop bitOpening and Closing the Port
Once we have configure every settings we can open the port using .Open() method.
The Open() method do not return any data so to check whether the port is open or not we can use the .isOpen property.The property is true if the port is open and false if the port is not open.
You can then close the port using the close() method.
COMPort.Open();
Console.WriteLine(COMPort.IsOpen);
COMPort.Close();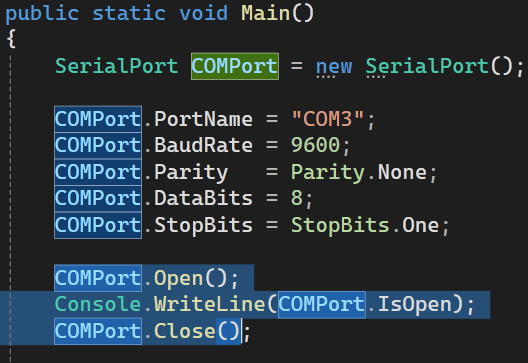
If you run the code
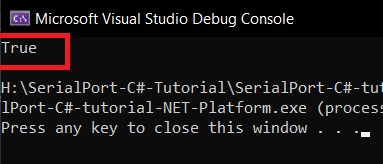
Please make sure that the Open() method is enclosed in a try catch block to handle unexpected exceptions which may arise while opening the serial port.
try
{
    COMPort.Open();
}
catch(Exception Ex)
{
    Console.WriteLine(Ex.Message);
}
Arduino Reset Issue
When you use the Open() Method ,the Arduino connected to the Serial port of your PC will get Reset. You should take that into account while coding.
This issue is specific for Arduino Only.
You can rectify it by adding a small delay after the Open() method.
COMPort.Open(); //Arduino gets reset
Thread.Sleep(1000)//Wait for 1 second
//Rest of the code below
Configuring the Serial Port using SerialPort Constructor
You can also directly configure the serial port by giving the values through the constructor while creating the COMPort object.
The SerialPort Constructor accepts the following parameters.
//pseudocode
SerialPort COMPort = new SerialPort("Port_name",Baudrate,Parity,Databits, StopBits);
So you can configure the port in following ways.
SerialPort COMPort = new SerialPort("COM3"); //Port name = COM3, rest will be default valuesSerialPort COMPort = new SerialPort("COM3",9600); //Port name = COM3 ,baudrate =9600 rest will be default valuesand finally
SerialPort COMPort = new SerialPort("COM3",9600,Parity.None,8, StopBits.One);
Serial Port Exceptions in C#
List of major exceptions you will encounter while opening the serial port in C# and how to mitigate it.
try
{
    COMPort.Open();     // Open the port
}
catch (UnauthorizedAccessException Ex)
{
  //Access is denied to the port
}
catch (ArgumentOutOfRangeException Ex)
{
  //Parity, DataBits,Baudrate are not valid values
}
catch (ArgumentException Ex)
{
   //The port name does not begin with \"COM\
}
catch (IOException Ex)
{
  //The port is in an invalid state
}
catch (InvalidOperationException Ex)
{
  //Port on the current instance of the SerialPort is already open
}
Reading Data from Serial Port using C#
Now we will learn how to read the data send by an external device like Arduino from PC serial Port using C# SerialPort API.
For testing this you need an Arduino or a Microcontroller board like ATmega328P,MSP430G2553 etc to send some data like a String "Hello to C# Serial Program from Arduino UNO" to PC Serial port.
Our C# code will read the string and display it on the Console.
For reading from the serial port ,the SerialPort Class provides multiple methods to read the received data from the input buffer of the serial port.
.ReadLine() - Read till you encounter a newline character(\n)
.Read()
.ReadByte() -Read a Single Byte
.ReadChar()- Read a Single Character
The easiest one to use is the .ReadLine() method which reads all the characters inside the receive buffer until it encounters a New Line Character (\n).
The method will not return ,if no NewLine character is encountered and a timeout happens, So we should sent a new line character from our Arduino or a Microcontroller for proper working of the code.
Clearing the Transmit/Receive Buffer in C#
You can clear the transmit and receive buffer of your PC 's Serial Port using the Following methods provided by the SerialPort class of C#.
DiscardInBuffer() -This method clears all the data in the Receive Buffer of the Serial Port or Virtual COM port
DiscardOutBuffer() -This method clears all the data in the Transmit Buffer of the Serial Port or Virtual COM port
This will help to remove any spurious character left from the previous transmission, So you can receive the data from Arduino Correctly.
Arduino to PC Serial Communication in C#

Arduino Transmit Code
Before running the C# program for receiving the data from the Arduino, You should upload the below code to your Arduino.
Make sure that baud rates match, here we are going to use 9600bps. You can find the full code on our GitHub.
void setup()
{
  Serial.begin(9600); // opens serial port, sets data rate to 9600 bps 8N1
}
void loop()
{
 char TextToSend[] = "Hello to C# Serial Program from Arduino UNO";
 Serial.println(TextToSend); // sends a \n with text
 delay(1000);
}
Here we are using Serial.println() which automatically sends a \n character (NewLine Character).
This makes the C# ReadLine() function return on the PC side.
C# Serial Port Reception Code (PC side)
The below is a simplified code to receive Serial data send from the Arduino UNO using C# on the .NET Platform.
This code runs on the PC side on Windows 10 or Windows 11 waiting for the Arduino to send the text string " Hello to C# Serial Program from Arduino UNO ".
//Simplified Code,Full code in GitHub Repo
//Change serial port number
public static void Main()
{
   SerialPort COMPort = new SerialPort("COM3", 9600, Parity.None, 8, StopBits.One);

   COMPort.Open();     // Open the port,Arduino Resets here

   COMPort.DiscardInBuffer(); //Clears the input buffer of the serial port

   Thread.Sleep(1500); //wait for 1.5 second for Arduino to stabilize

   String RecievedText = COMPort.ReadLine(); // Read Data from SerialPort

   Console.WriteLine(RecievedText); //Display received data
   COMPort.Close(); // Close port
}
The code opens the serial port COM3 .this number may vary between system to system.
Then we clears the Receive Buffer of the PC Serial Port using COMPort.DiscardInBuffer() to remove any unwanted characters still lingering in there from the last reception.
On Opening the Serial Port ,The Arduino gets RESETed because of the changes in the serial port lines. So we use the Thread.Sleep(1500) to pause the code here for 1.5 seconds.
We then use the COMPort.ReadLine(); to get the data send by the Arduino. The Arduino sends the Newline character(\n) which makes the ReadLine() method return.
String is displayed on the Command line .
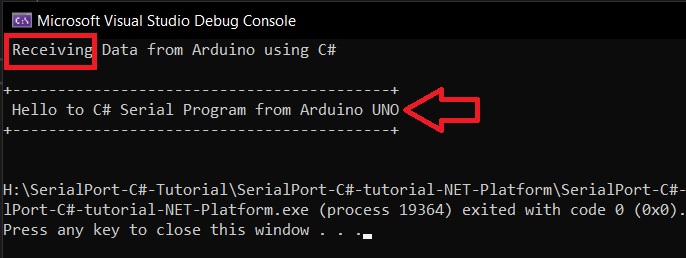
Setting up Serial Port Read timeouts in C#
Some times the Serial Communication may get held up due to the transmitting device getting stuck or a myriad of other reasons. In these situations our WriteLine() method will wait for ever and hang up our serial port program.
To prevent this we need to set up Read Time Outs in Our C# Serial Port program.
Read Timeouts will create an Exception (TimeoutException) after a specified time has elapsed.
Here is the Partial code for this, full code in Repo
//Partial code
//Open Port,clear RX Buffer etc

Thread.Sleep(1500); //wait for 1.5 second for Arduino to stabilize

COMPort.ReadTimeout = 2000; //Set Read Timeout for 2 seconds

try
{
   String RecievedText = COMPort.ReadLine(); // Read Data from SerialPort
   Console.WriteLine($" {RecievedText} ");    //Display received data                                       //
}
catch (TimeoutException Ex)
{
  Console.WriteLine(Ex.Message);
}

finally
{
  COMPort.Close();
}
Here we set up a 2 seconds timeout ,2000ms using
COMPort.ReadTimeout = 2000; //Set Read Timeout for 2 secondsNow this will create a TimeoutException after 2 seconds if the ReadLine() does not return. So we will have to enclose the ReadLine() inside a try catch block to catch the exceptions.
On the Arduino side we will not be sending the /n character making the ReadLine() on the PC side wait for ever.
So when we run the code we will get the following result.

Writing data to the Serial Port using C#
To write data into the Serial Port, C# SerialPort class provides two methods
Write() - Which writes a string to the Serial port without sending a \n character
WriteLine() - Which writes a string to the Serial port along with a NewLine character (\n)
COMPort.Write("A"); //Send A
COMPort.Write("Hello");
COMPort.WriteLine("Hello"); // Hello+\n
PC to Arduino duplex Serial Communication in C#

C# PC side Serial Transmission Code
In our case , We will be using the Write() method to send characters like A,B etc .to an Arduino board connected to our PC's Serial Port.
So we will send the character using Write () method and immediately listen to the serial port using COMPort.ReadLine(); to get back the characters from the Arduino.
COMPort.Write("A"); //send character A to Arduino
String EchoedBack = COMPort.ReadLine(); //Switch back to listen on serialport to get data send by Arduino
Console.WriteLine(EchoedBack);

COMPort.Write("B");
EchoedBack = COMPort.ReadLine();
Console.WriteLine(EchoedBack);

COMPort.Write("#");
EchoedBack = COMPort.ReadLine();
Console.WriteLine(EchoedBack);

COMPort.Close();
Arduino Side Code
On the Arduino side, the Arduino Receives the character and echo's back using a switch structure as shown below.
void loop()
{

 char ReceivedByte = 0;

   if(Serial.available()>0)
   {
     ReceivedByte = Serial.read();

     switch(ReceivedByte)
     {
       case 'A':
                 Serial.println("Arduino Received Charcter A");
                 break;
       case 'B': Serial.println("Arduino Received Charcter B");
                 break;
       default : Serial.print("Arduino Received Charcter ");
                 Serial.println(ReceivedByte);
     }
   }
}
You can use this code to control devices from your computer using Serial Port and C#.
Screenshots of the program running on Windows.

Supported Microcontrollers
In this tutorial most of the codes are written for Arduino Platform.
Our GitHub Repo also contains codes written in Embedded C for communicating with
- MSP430G2553 Microcontroller
- and ATmega328P Micro Controller.
Controlling the RTS and DTR pins of Serial Port using C#
After reading and writing to the serial port, its time to play with the other pins of a serial port like DTR and RTS .
In Some USB to Serial Converters DTR and RTS pins are not available, only the RXD,TXD and Ground pins are available outside.
In USB2SERIAL all 9 pins are brought outside to Screw terminals which you can easily access as shown below.
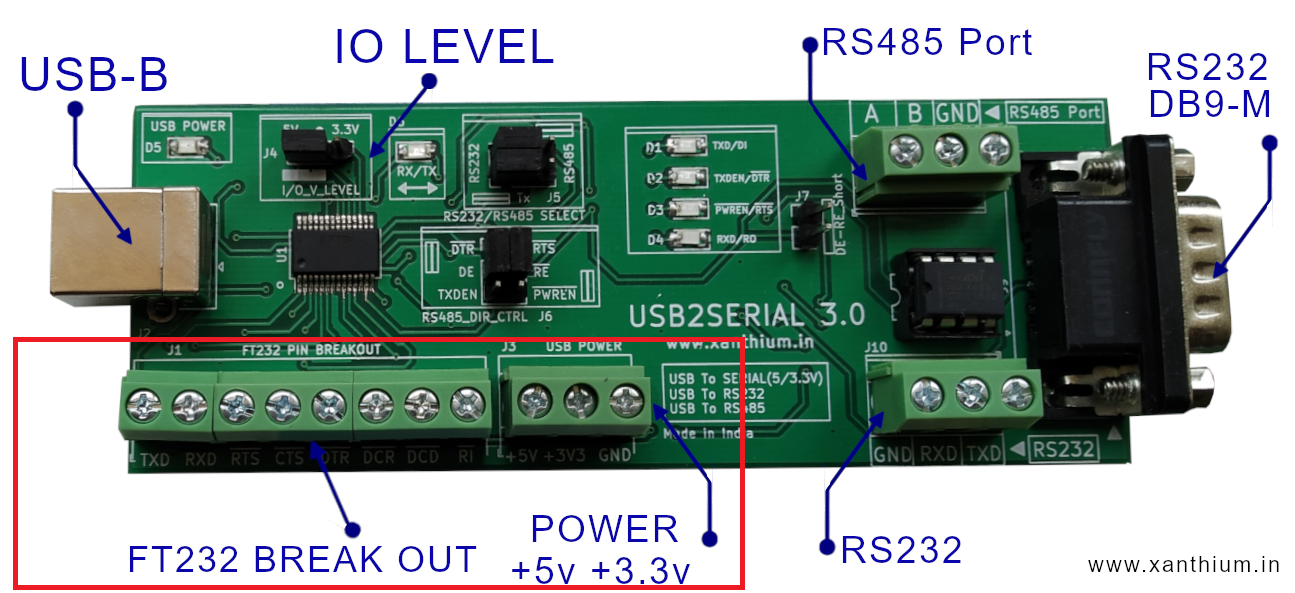
One use of RTS and DTR pins is used to control the RS485 chips during a USB to RS485 conversion.
When you have to control some thing over several 100's of meters ,RS232 or USB will not be suitable. In such cases we have to use RS485 protocol, one problem with RS485 is that most PC's / Laptops will not have an RS485 port. You can solve that problem by using USB to RS485 converters like USB2SERIAL .
In USB2SERIAL, RTS pin is used to put the RS485 chip in receive mode and DTR pin is used to put theRS485 chip in transmit mode.
Please note that in FT232 based USB to Serial converters (like USB2SERIAL) the RTS and DTR pins are inverted internally so setting the pins high will make then low and vice versa
The SerialPort Class in .NET have two properties called RtsEnable and DtrEnable enable to control the RTS and DTR pins respectively.
The code shown below will show you how to control the pins.
using System;
using System.IO.Ports;
namespace SerialPort_Tutorial
{
   class SerialPort_Write
   {
       static void Main(string[] args)
       {
           SerialPort MyCOMPort = new SerialPort();

           MyCOMPort.PortName = "COM46";//name of serial ported
           MyCOMPort.Open();            // Open the port

           MyCOMPort.RtsEnable = true;  // RTS pin = 1 ,~RTS = 0
           Console.Read();              // Press any key

           MyCOMPort.RtsEnable = false; // RTS pin = 0 ,~RTS = 1
           Console.Read();

           MyCOMPort.DtrEnable = true;  // DTR pin = 1, ~DTR = 0
           Console.Read();

           MyCOMPort.DtrEnable = false; // DTR pin = 0, ~DTR = 1
           Console.Read();

           MyCOMPort.Close();             // Close port
       }//end of Main
   }//end of class
}//end of namespace
The RTS pin is set high using MyCOMPort.RtsEnable = true; and it is set low using MyCOMPort.RtsEnable = false; .
Since the pins are inverted internally (in FT232)
Setting the RTS pin MyCOMPort.RtsEnable = true; will make the pin LOW and
Clearing the pin using MyCOMPort.RtsEnable = false; will make it HIGH, same goes for DTR pin also.
Please note that the USB2SERIAL also has onboard LED's near the RS485 section to display the status of RTS and DTR lines used to control the RS485 chip.
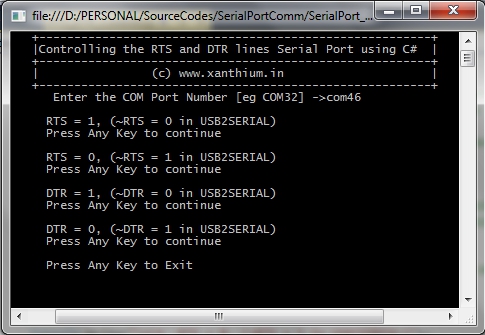
Screenshot of the program executing on Windows
- Log in to post comments
