In this tutorial we will learn how to integrate the SQLite database into a WinForms application using C# language on the .NET platform.
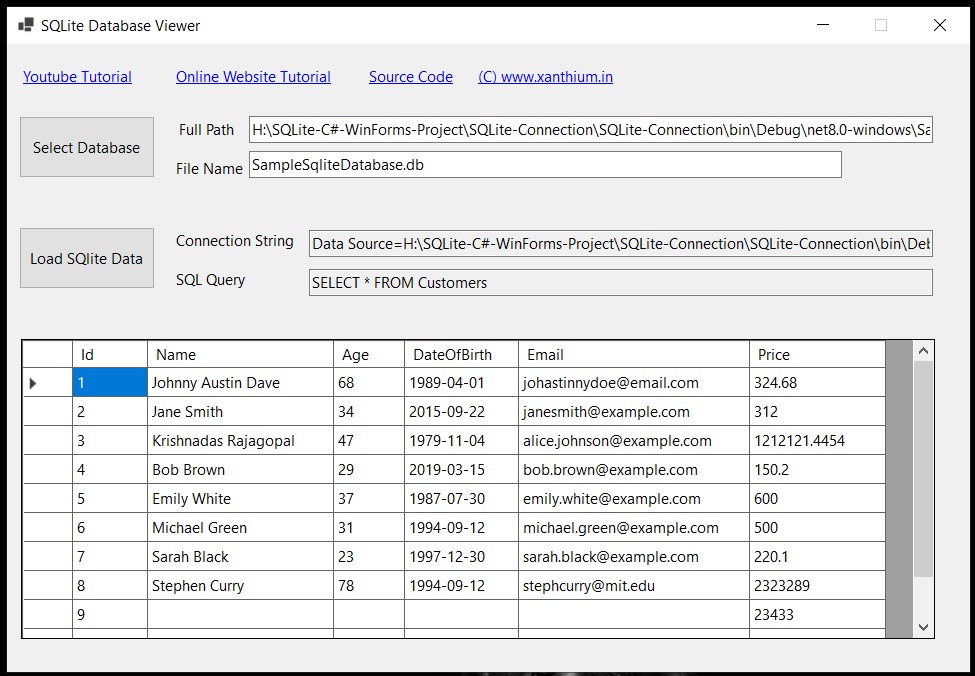
The Winforms application shown below can open a connection to a SQLite database and display the contents of the database table on a Form using DataGridView control.
In the previous tutorial we learned how to connect to SQLite database from command line using C# and perform database operations like read, write ,update etc.
Here we will learn to create a C# WinForms GUI application that will interact with a SQLite database on disk and perform basic database CRUD operations
The WinForms application will open a SQLite database on the disk using the OpenFileDialog control and display the contents of the SQLite database on a WinForms DataGridView Control for easy manipulation.
Contents
- Source Codes
- Creating a C# SQLite WinForms Project
- Installing System.Data.SQlite.Core Package
- Connecting to SQLite Database using WinForms
- Creating a Connection String
- Displaying SQLite data on Windows Form GUI
Source Codes

All the source codes for C# WinForms SQLite Project along with Sample database and Visual Studio Solutions are available on our GitHub Repo
- Download C# WinForms SQLite Project Source Codes from GitHub
- Browse C# WinForms SQLite Project Source Codes from GitHub
Creating a C# SQLite WinForms Project
Here we will be using Visual Studio Community Edition to Create and Compile the SQLite WinForms Project. If you want you can use the .NET SDK CLI tools also but Visual Studio is better due to the presence of the GUI Form Designer.
The SQLite WinForms Project is specific to the Windows platform (windows 10,Windows 11) as the support for WinForms is limited or non existent in other platforms like Linux or Mac OS.
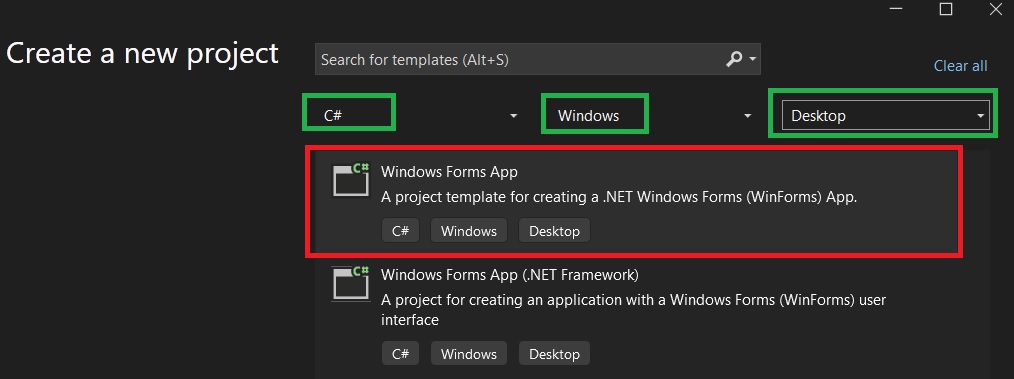
First we will create a Desktop WinForms Project for C# language as Shown below.
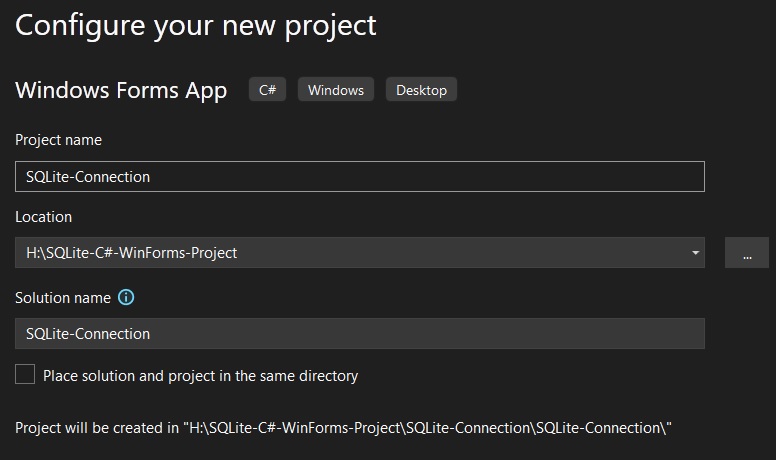
After which give a suitable name to your C# SQLite Project and save it in your disk.
Installing System.Data.SQlite.Core Package
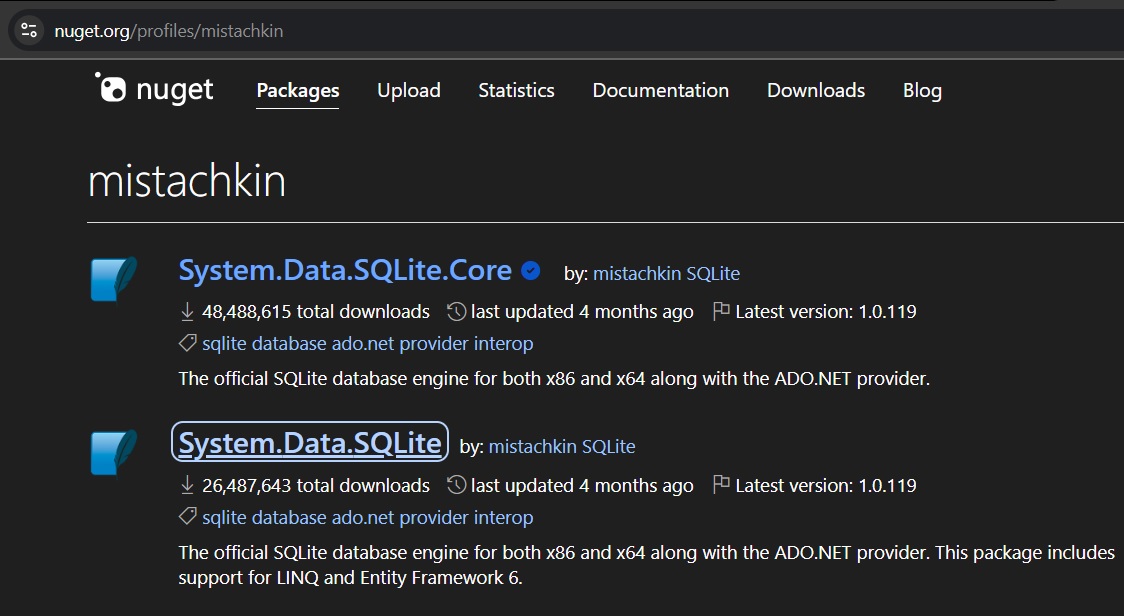
Now to access the various classes and methods needed to communicate and manipulate the SQLite database we need to install the System.Data.SQlite.Core Package.
System.Data.SQlite.Core contains only the core methods and classes needed to access the SQlite database .Fo our Purpose this library will be enough.
While System.Data.SQLite package has support for LINQ and Entity Framework 6,You can also use that library .
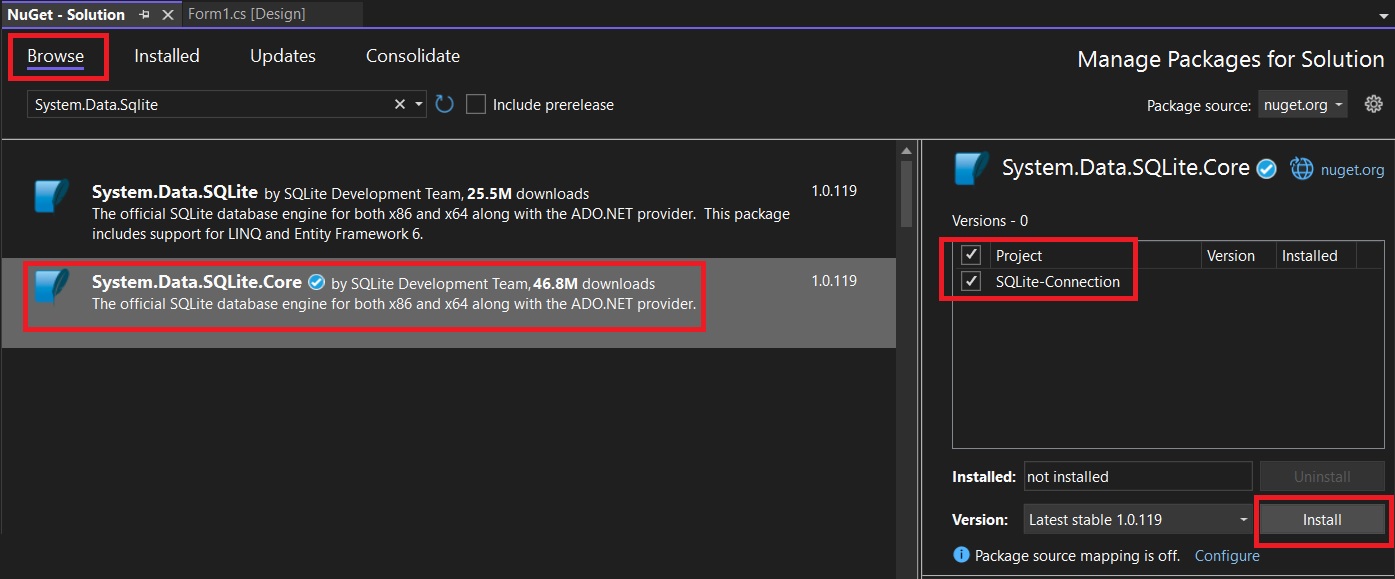
Now we will install System.Data.SQlite.Core to our Visual Studio Project using NuGet Package manager.
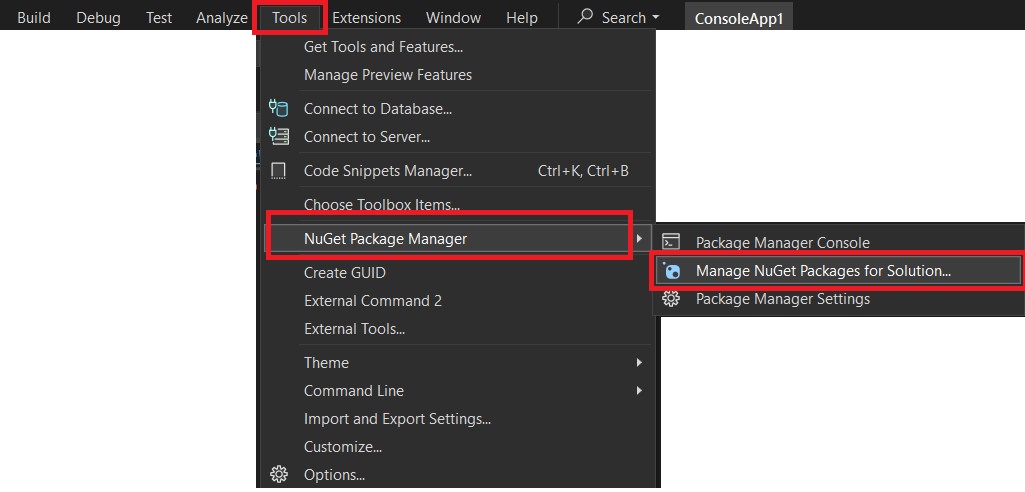
Go to Tools -> "Nuget Package Manager" ->"Manage NuGet Packages for Solution". As shown below
Under Browse tab, search for System.Data.SQlite.Core Select it and click install as shown below.
After successful installation it will show up under installed tab, As shown below

Connecting to SQLite Database
Now we will open a connection to the SQLite database from our WinForms GUI app using C# and open it. Here we will be opening an existing SQLite database on disk instead of creating it from scratch. You can download the sample database from our GitHub Repo (above).If you are curious on how to create a SQLite database using C#, check this tutorial .
Here we will be using the OpenFileDialog Control available in the WinForms GUI framework to open a connection to the SQLite database.
OpenFileDialog Control is used to manually locate the SQLite database file in our File system and use the FileName property to get the full path to the SQLite db.
Once we have the full path to the database ,we can construct a connection string and open a connection to the SQLite database.
The code snippet below show how to create a dialog box to open a connection to SQLite database. Please use the full code from our GitHub Repo
String SQliteDatabaseFilePath = "";
OpenFileDialog OpenDatabaseFileDialog = new OpenFileDialog()
OpenDatabaseFileDialog.InitialDirectory = Environment.CurrentDirectory;
OpenDatabaseFileDialog.Title = "Open SQLite Database File";
if (OpenDatabaseFileDialog.ShowDialog() == DialogResult.OK)
{
   SQliteDatabaseFilePath = OpenDatabaseFileDialog.FileName;
}
The Entire code is inside the Button Click Event handler of the Button "Select Database".So when we click the button the above code will run and open a dialog box to select the database.
Here we create a OpenFileDialog object called OpenDatabaseFileDialog
OpenFileDialog OpenDatabaseFileDialog = new OpenFileDialog()you can set the default directory which the OpenFileDialog will try to open by setting the InitialDirectory property. Here it is set to current directory. you can also set to specific directory like shown below
OpenDatabaseFileDialog.InitialDirectory = @"C:\documents"
When ShowDialog() method is called on the OpenFileDialog , it displays the dialog to the user and pauses the execution of the program until the user closes the dialog (either by selecting a file or canceling the operation).
- If the user selects a file and clicks "OK", ShowDialog() returns DialogResult.OK.
- If the user cancels or closes the dialog without selecting a file, it returns DialogResult.Cancel.
if (OpenDatabaseFileDialog.ShowDialog() == DialogResult.OK)
{
   SQliteDatabaseFilePath = OpenDatabaseFileDialog.FileName;
}
The above code checks whether the user presses Ok (Open) or Cancel button in the dialogue. If the user presses Ok (Open),the full path of the the selected file here SQLite database is stored in the string variable SQliteDatabaseFilePath.
You can then display the full filename and path on the respective text boxes as shown below.
TextBox_DB_Path.Text = SQliteDatabaseFilePath;
TextBox_DB_Name.Text = Path.GetFileName(SQliteDatabaseFilePath);
here we are using the Path.GetFileName() to isolate just the file name from the full path.

Creating a Connection String
Once we have managed to get the full path to our database, We will create a connection String to communicate with our SQLite database.
String ConnectionString = $"Data Source={SQliteDatabaseFilePath};FailIfMissing=True";Here FailIfMissing=True because we want to connect with the existing database ,not create a new one .
Once we have the connection string ,we can open a connection to our database using the SQLiteConnection class as shown below.
using (SQLiteConnection MyConnection = new SQLiteConnection(ConnectionString)) // Create a SqliteConnection object called Connection
{
   MyConnection.Open();              //open a connection to sqlite 3 database
}
Displaying SQLite database table on WinForms
Here we will learn how to display the data present in a SQLite database in a tabular or grid view on a Windows Form using the DataGridView Control present in WinForms.
For displaying SQLite table Data on a Windows Form, You should be aware of the following classes which we will use in our code.
- SQLiteDataAdapter - provided by the System.Data.SQLite library
- DataTable - part of the System.Data Namespace
- DataGridView - Part of the WinForms Namespace
Using SQLiteDataAdapter Class with SQLite
The SQLiteDataAdapter class in C# is part of the System.Data.SQLite library and is used to interact with SQLite database by retrieving data and sending updates from DataSet or DataTable to the database.
The SqlDataAdapter acts as a bridge between the database and the in-memory data representation, typically a DataSet or DataTable.

The below code shows how to use the SQLiteDataAdapter class to fill a DataTable instance with data from a SQLite database.
//Partial code on using SQLiteDataAdapter class in C#
using (SQLiteConnection MyConnection = new SQLiteConnection(ConnectionString)) //Create a SqliteConnection object called Connection
{
    MyConnection.Open(); //open a connection to the database
    String SQLQuerySelectAll = "SELECT * FROM Customers";

    // Create a SQLiteDataAdapter to retrieve data
    using (SQLiteDataAdapter dataAdapter = new SQLiteDataAdapter(SQLQuerySelectAll, MyConnection))
    {

        DataTable dataTable = new DataTable(); // Create a DataTable to hold the data
        dataAdapter.Fill(dataTable);           // Use the Fill method to retrieve data into the DataTable
        //Display data
        foreach (DataRow row in dataTable.Rows)
        {
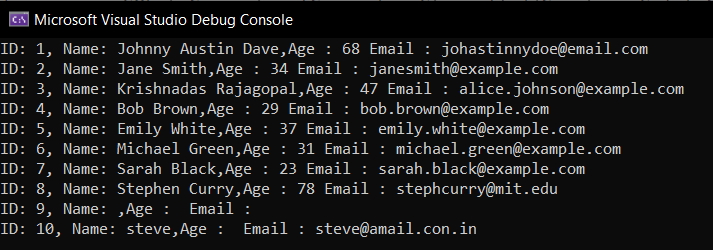
            Console.WriteLine($"ID: {row["id"]}, Name: {row["name"]}, Age : {row["age"]} Email : {row["Email"]}");
        }
    }
}
If you run the code you will see the below output.
using (SQLiteDataAdapter dataAdapter = new SQLiteDataAdapter(SQLQuerySelectAll, MyConnection))
{
   DataTable dataTable = new DataTable(); // Create a DataTable to hold the data
   dataAdapter.Fill(dataTable);           // Use the Fill method to retrieve data into the DataTable
}
We create a SQLiteDataAdapter instance called dataAdapter and then we call the Fill() method.
When you call the Fill() method, the dataAdapter executes the SQLQuerySelectAll (SELECT * FROM Customers) query against the SQLite database and retrieves the result set which is then used to fill the dataTable.
Then we call a foreach loop to iterate through the rows inside the dataTable.
You can also use
Console.WriteLine($"{dataTable.Rows[0]["name"]}");//name value in first coloumn
Console.WriteLine($"{dataTable.Rows[1]["name"]}");
Console.WriteLine($"{dataTable.Rows[2]["name"]}");
to list row by row.
Displaying the SQLite data using DataGridView Control
DataGridView control is a powerful and flexible data presentation control in Windows Forms (WinForms), part of the .NET platform. It provides a customizable, tabular interface for displaying, editing, and interacting with data in a grid-like format. It is commonly used to display data from databases, arrays, lists, or other data sources in a tabular form.
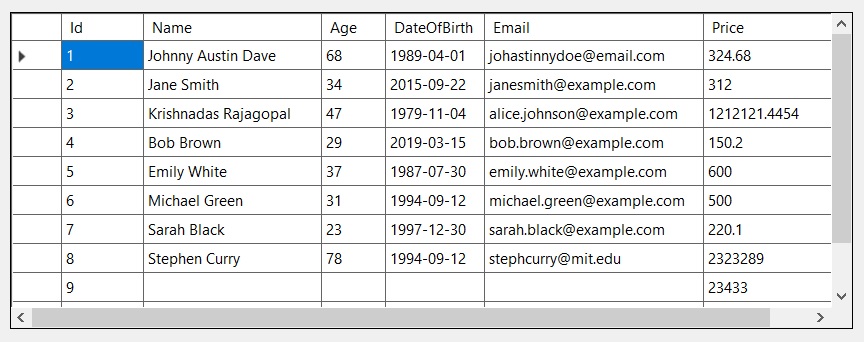
DataGridView allows users to edit the contents of the cells directly, whether it's text, numbers, dates, or other types of data. You can control whether the cells are read-only or editable.
Before we display something ,make sure that the database you are using has some data in it which we can display on a windows form. You can download our sample database from our GitHub Repo.
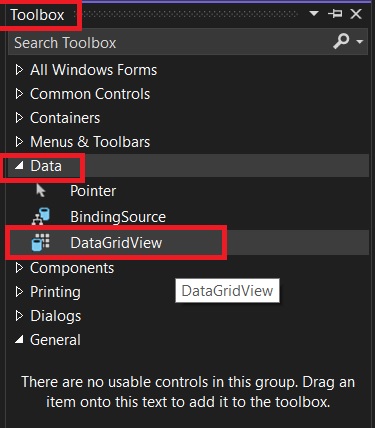
So you can drag the control to your form from the Toolbox.
You can then populate the DataGridView control using a dataTable object.
using (SQLiteDataAdapter dataAdapter = new SQLiteDataAdapter(SQLQueryExecuted, MyConnection))
               {
                   DataTable dataTable = new DataTable();
                   dataAdapter.Fill(dataTable);

                   dataGridView1.DataSource = dataTable; //populate the datagrid view
               }
Here the contents of the DataGridView control will depend upon the SQL query Executed and the the Contents of the SQLite database table.
In our case we are putting all the code for Opening a connection to the database and displaying the SQLite data inside the Button Click Handler of the Load SQLite Data Button on our app.
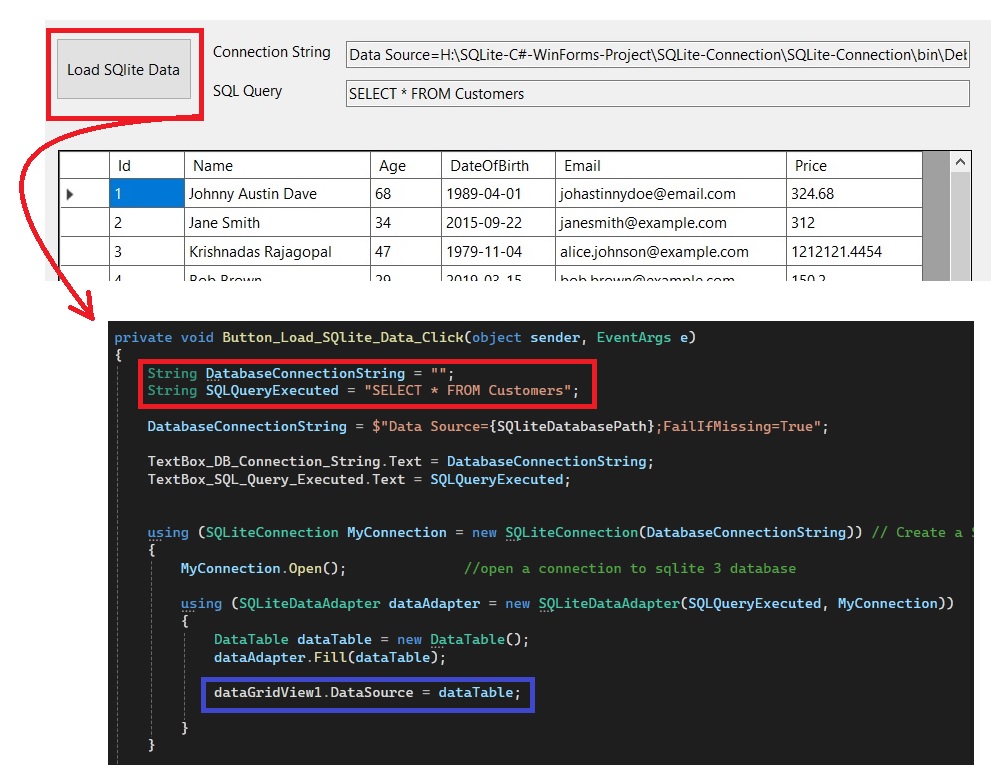
C# Code for displaying the SQLite database data is shown below.
private void Button_Load_SQlite_Data_Click(object sender, EventArgs e)
{
   String DatabaseConnectionString = "";

   String SQLQueryExecuted = "SELECT * FROM Customers"; //SQL Query to be executed

   DatabaseConnectionString = $"Data Source={SQliteDatabasePath};FailIfMissing=True"; //create database connection using the full path

   TextBox_DB_Connection_String.Text = DatabaseConnectionString;
   TextBox_SQL_Query_Executed.Text = SQLQueryExecuted;
   using (SQLiteConnection MyConnection = new SQLiteConnection(DatabaseConnectionString)) // Create a SqliteConnection object called Connection
   {
       MyConnection.Open();              //open a connection to sqlite 3 database

        using (SQLiteDataAdapter dataAdapter = new SQLiteDataAdapter(SQLQueryExecuted, MyConnection))
       {
           DataTable dataTable = new DataTable();
           dataAdapter.Fill(dataTable);

           dataGridView1.DataSource = dataTable; //Populate the datagridview
       }
   }
}
Here we will be giving the SQL Query
String SQLQueryExecuted = "SELECT * FROM Customers";So that all the data available in the sample database table called Customers is shown on the DataGridView table.
You can change this query to suit your needs, without making any changes to the datagridview table.
For example ,you can give the following query to display only select columns.
String SQLQueryExecuted = "SELECT id,name,email FROM Customers";On executing this you will get the following output.
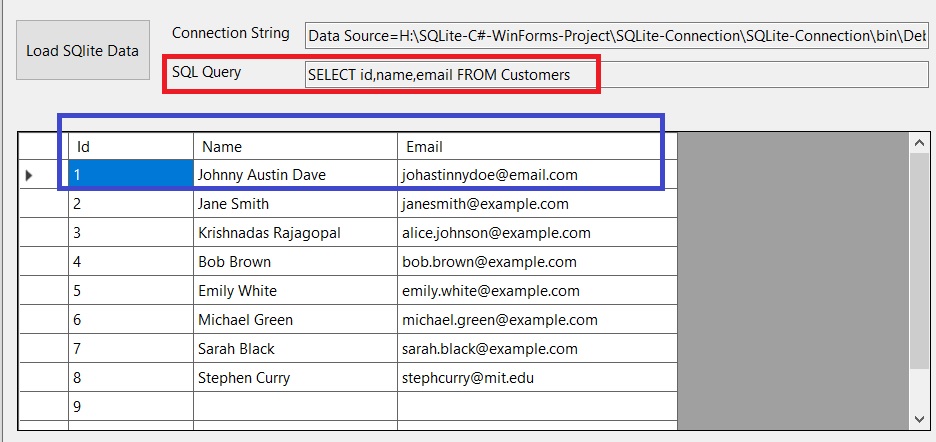
only id ,name and email are shown and the table automatically resizes to suit your needs.
You can also display other tables by changing the SQL String.
Here we are displaying another database from Kaggle.
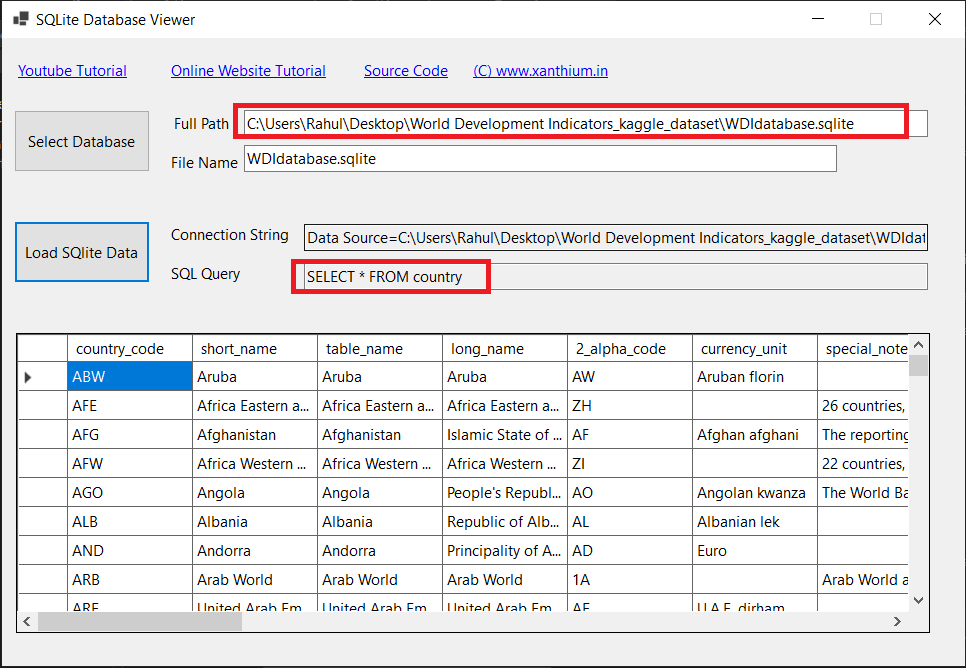
- Log in to post comments
