
In this tutorial, We will learn to connect with a Sqlite (sqlite3) database using C# on the .NET platform across multiple platforms like Windows, Linux and macOS.
The tutorial guide is aimed at beginners who are new to ADO.NET interface for the SQLite library and wants to program the sqlite3 library using C# language for CRUD (Create, Read, Update and Delete) operations. You will learn to create tables, read data from SQLite tables, write and update data to a SQLite database using C# in this tutorial.
All the examples in this C# SQLite tutorial runs on the command line and is intended to highlight the basic concepts behind C# SQLite database programming.
If you are looking for building SQLite Applications that uses a GUI framework like WinForms do check our C# SQlite WinForms tutorial Here.
We will also teach you how to configure a Visual Studio Project to access a SQLite Database using C# and download the required NuGet packages to communicate with the database. This tutorial also teaches you to setup .NET SDK CLI to program SQLite database from C# on Windows and Linux systems.
Contents
- Source Codes
- What is SQLite
- What is ADO.NET
- Required .NET Namespaces for SQLite Database Access
- Compilers and IDE's used
- Connecting to a SQLite Database using C#
- Creating and adding data to SQLite Database using C#
- Creating a table inside SQLite database
- Inserting Data to a SQLite Database
- Reading Data from SQLite Database
- Reading Sqlite columns by Index/Ordinal
- Reading Sqlite columns by Name
- Handling/Reading Null Values in the SQLite database
- Updating a Record in a SQLite Database using C#
- Deleting data in a SQLite Database using C#
Source Codes

You can find all the C# example code for creating and updating the SQLite Database from our GitHub Repository, We have also provided solution files for Visual Studio Community edition and .NET SDK CLI projects in our Repo. Link is shown below
Browse Basic SQLite Database CRUD Operations using C# on .NET Platform
Download Basic SQLite Database CRUD Operations using C# on .NET Platform as Zip File
What is SQlite

SQLite is a self-contained, serverless, and opensource SQL database engine known for its ease of use and versatility. It doesn't need a separate server process like MySQL/MariaDB, PostgreSQL or Microsoft SQL Server, storing the entire database, including schema and data, in a single disk file.
SQLite and SQLite3 essentially refer to the same database engine.
SQLite supports ACID transactions, ensuring data integrity and reliability. As a relational database management system, it offers standard SQL features such as tables, indexes, views, and triggers, facilitating structured data manipulation.
SQLite is cross-platform and can run on various operating systems like Windows ,Linux,MacOS including mobile platforms like iOS and Android, making it popular for embedded systems and mobile app development.
Being open-source (public domain software), SQLite is freely available for use, modification, and distribution without any licensing restrictions.
What is ADO.NET
ADO.NET is a framework developed by Microsoft that allows developers to access and manipulate data stored in databases like MySQL, SQlite,MS SQL Server etc. It's a part of the larger .NET platform and provides a set of classes for interacting with data sources such as relational databases.
Key components of ADO.NET are
Connection: A connection object represents a connection to a data source. It provides methods for opening and closing connections to the database. For Sqlite ,it is SQLiteConnection
Command: A command object represents a SQL statement or a stored procedure that is executed against a data source. It includes methods for executing commands and retrieving results. For Sqlite ,it is SQLiteCommand
DataReader: The DataReader object provides a forward-only, read-only stream of data from a data source. It's efficient for retrieving large volumes of data when you need to read records sequentially.
DataAdapter: A DataAdapter serves as a bridge between a dataset and a data source. It populates a dataset with data from the data source and updates changes made to the dataset back to the data source.
DataSet: A DataSet is an in-memory cache of data retrieved from a data source. It represents a disconnected set of tables that can hold multiple result sets from one or more data sources.
Required Namespaces
For accessing the sqlite3 database using ADO.NET we need to include the System.Data.Sqlite namespace in our C# program .
System.Data.SQLite is a .NET data provider for SQLite ,which allows developers to interact with SQLite databases using the ADO.NET programming model. This namespace will provide classes and properties needed to access the SQLite database.
Another namespace you can use is the one provided by the Microsoft called Microsoft.Data.Sqlite
Both libraries offer similar functionalities for working with SQLite databases, including connection management, command execution, data retrieval, data manipulation, and transaction support.
Compilers and IDE's used
Here we will be working with C# and the .NET platform to develop software that will communicate with a SQlite Database on Disk. For dotnet development we can either use
Visual Studio Community Edition or
.NET SDK CLI tools
DB Browser for SQLite
All tools are free to download and use.
If you are not familiar with .NET SDK CLI tools ,do check our tutorial on how to use .NET SDK CLI here.
We cannot use a Text editor like Notepad to view the contents (rows and tables) of the SQLite database created by our program .
We needed to use specialized program like DB Browser for SQLite to view the data inside our SQLite database.
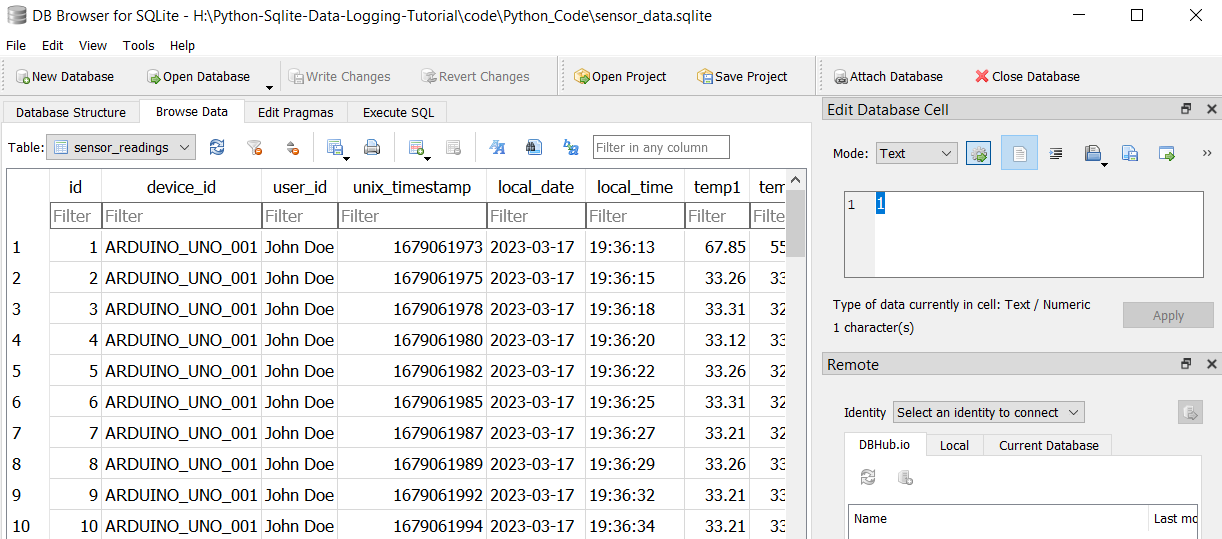
DB Browser for SQLite can be downloaded from here.
Creating a C# SQLite Project in Visual Studio
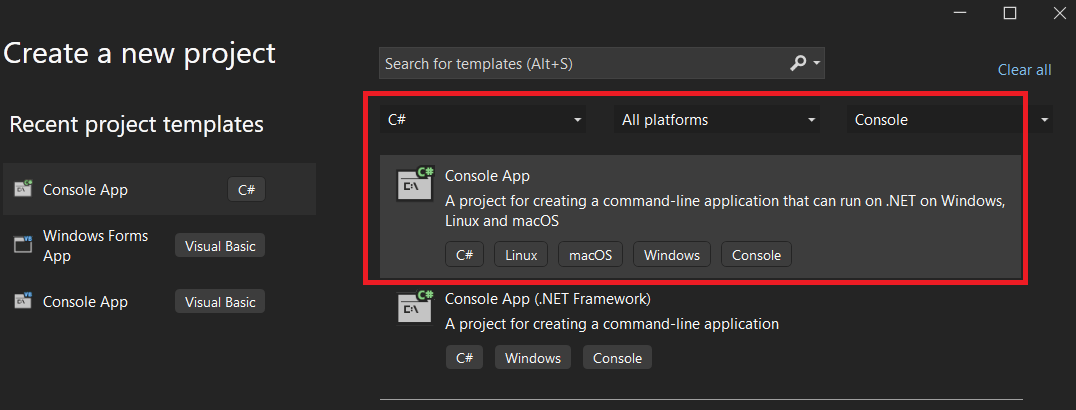
We will be create a simple console project targeting the .NET platform as shown below. Give a name you like to the project and select a location to store your project.
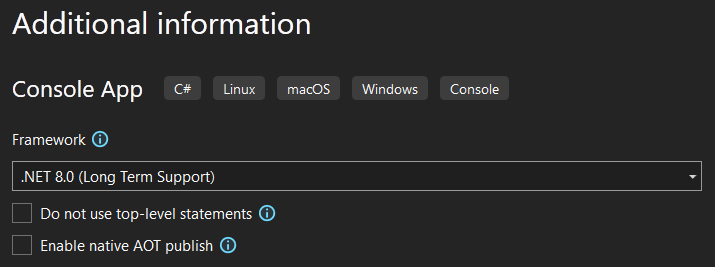
Select the version of the .NET platform, you want to use ,Here i am using .NET 8.0 LTS version.
You will be greeted by the following screen
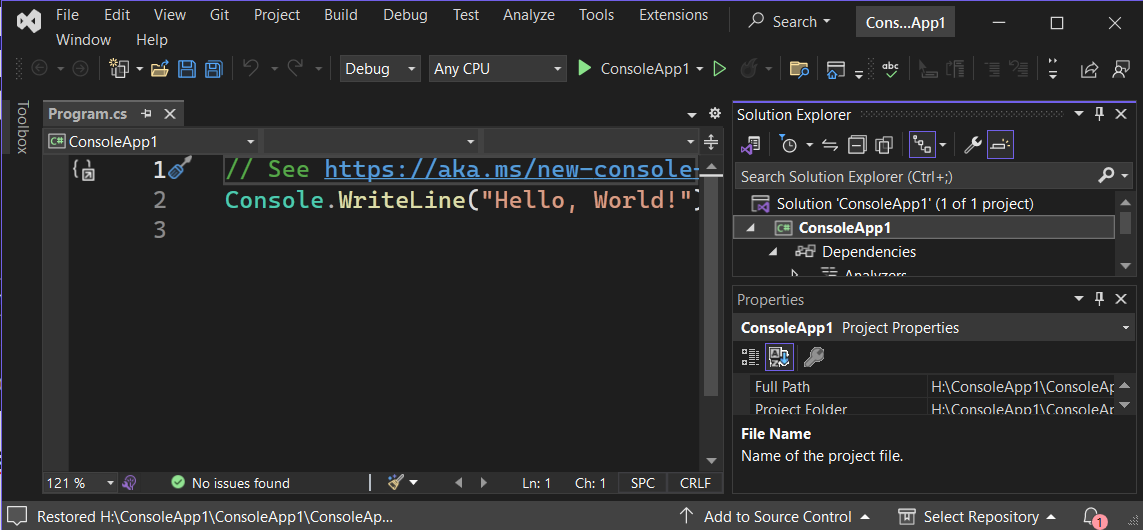
Now we need to install the System.Data.SQlite NuGet package to our project file ,so we can access the classes and methods needed to access the SQLite database.
Now go to Tools -> "Nuget Package Manager" ->"Manage NuGet Packages for Solution". As shown below
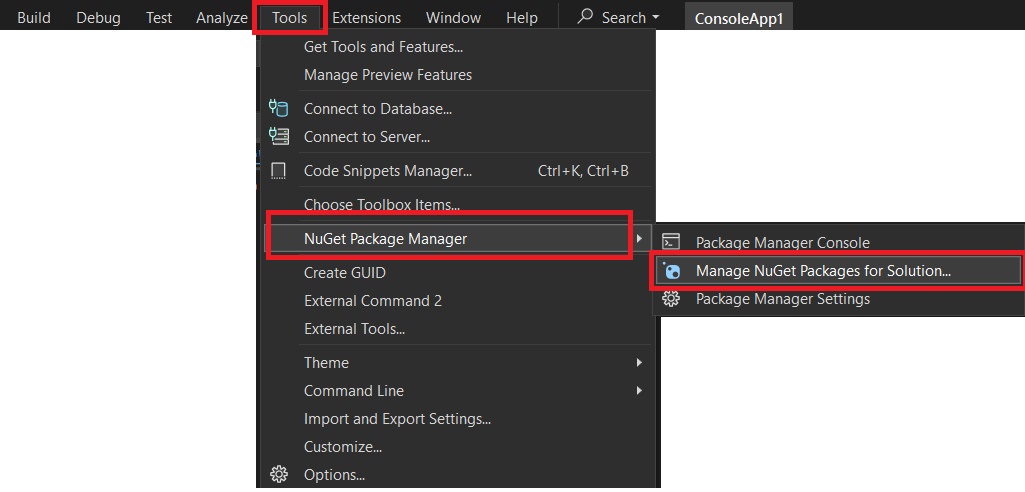
which will bring up a new tabbed window as shown below
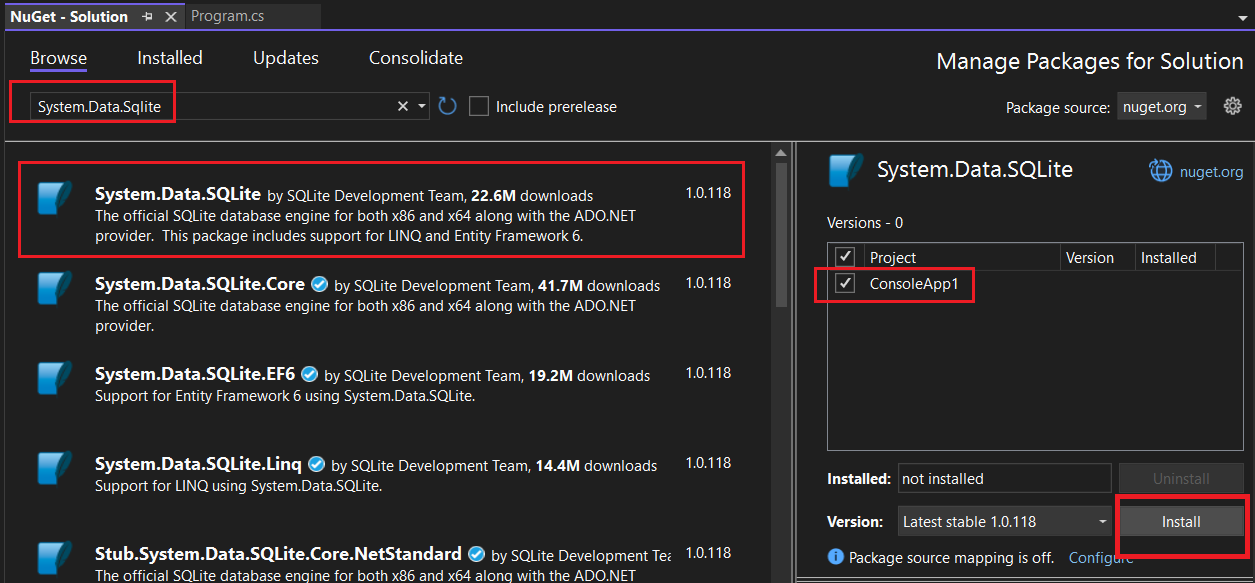
Below the "Browse" tab search for System.Data.SQlite. Select the project you want to install, here ConsoleApp1 and Press " Install " as shown in the above image. Approve changes and Accept the Licenses for individual libraries.
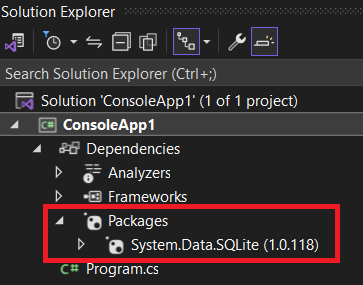
The installed library can be seen under "Packages" inside the Solution Explorer as shown above.
Creating a C# SQLite Project in .NET SDK CLI tools
Here we will create a console project using .NET SDK CLI tools for interfacing a SQlite3 library with C# Application and then add the required NuGet Packages to the command line project.
Before you start, Make sure that the .NET SDK CLI is installed on your Windows or Linux System.
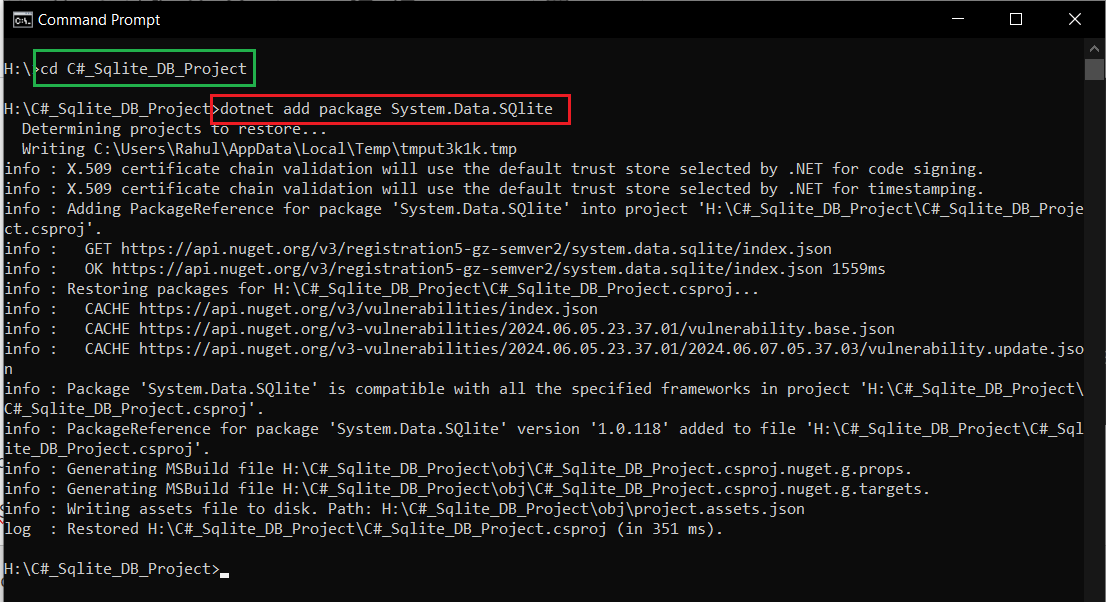
Now lets create a simple console project using the below command. Here C#_Sqlite_DB_Project is the name of my project, feel free to give any name for your project.
dotnet new console -n C#_Sqlite_DB_Project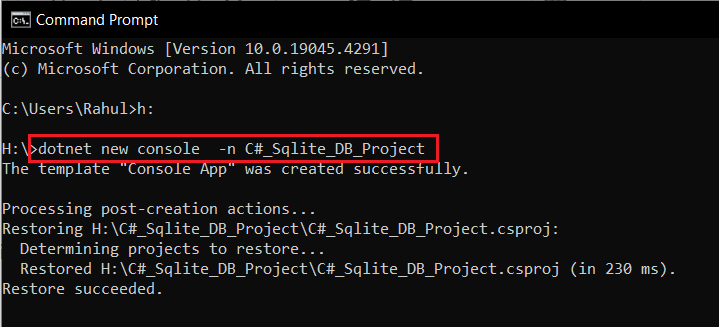
Now change directory to C#_Sqlite_DB_Project
You can add System.Data.SQlite. Nuget package to your Project using the below command
dotnet add package System.Data.SQlite
How to Connect to a SQLite Database using C#
Once you have chosen your IDE , Visual Studio or .NET SDK CLI and added the required NuGet packages to your project as shown in the above paragraphs .
It is time to start building our code to connect with the SQLite database.
SQLite is a self contained and server less database ,that means that we don't have to install any database software to our PC. The SQLite database can be created by our code while running or it can talk with an existing SQLite database file sitting on your disk.
Creating a SQLite Database using C#
Here we will create the SQLite Database programmatically while running the code.
The code below will create a SQLite database called MySqliteDatabase.db and open a connection to that database and then close it. If you run the below code example ,you can find a file named MySqliteDatabase.db in your directory.
If you are using Visual Studio 2022 community Edition,
MySqliteDatabase.db will be found in \bin\Debug\net8.0\MySqliteDatabase.db
Size of the sqlite file will be 0 bytes as we are not writing any data to the file.
using System.Data.SQLite; // classes for db access
namespace SqliteDatabaseAccess
{
  class MySqliteDBOps
  {
    public static void Main()
    {

      String ConnectionString = @"Data Source=MySqliteDatabase.db";           // MySqliteDatabase.db will be in "\bin\Debug\net8.0\MySqliteDatabase.db"
      SQLiteConnection MyConnection = new SQLiteConnection(ConnectionString); // Create a SqliteConnection object called Connection

      MyConnection.Open(); //open a connection to the database
      MyConnection.Close();//Close the connection with database

    }//End of Main()
  }//End of Class
 }//End of namespace
In Visual Studio ,you will find the database in
- \bin\Debug\net8.0\MySqliteDatabase.db (if selected Debug config)
or
\bin\Release\net8.0\MySqliteDatabase.db (if selected Release config)
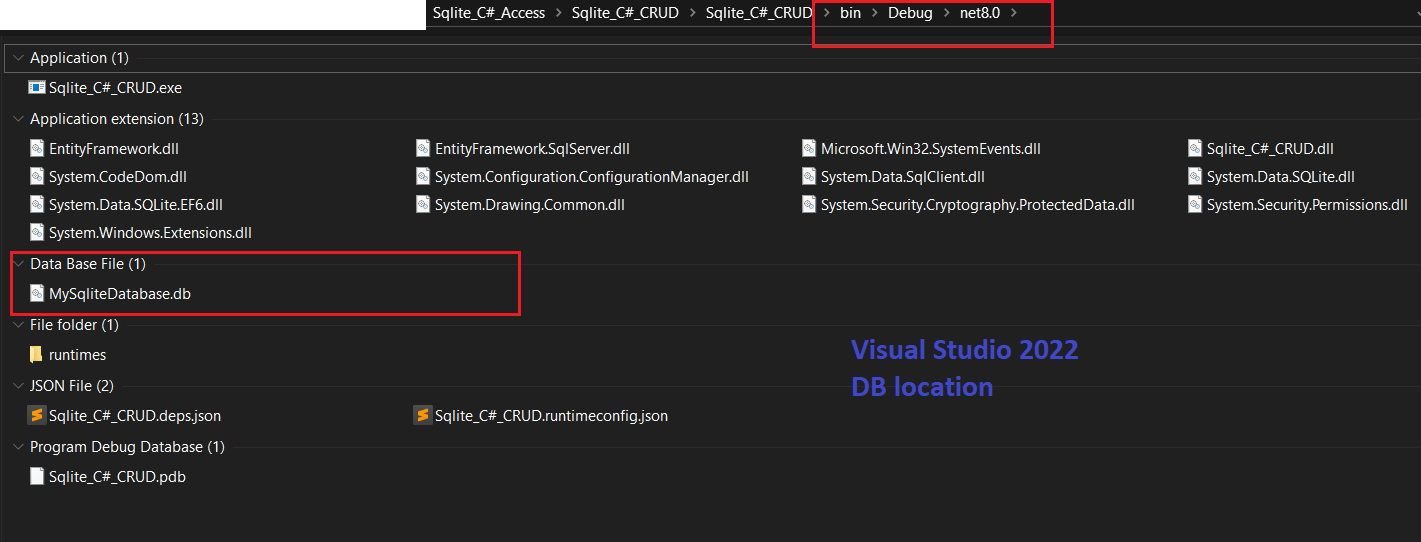
on .NET SDK ,you can find the database inside the directory.

Understanding Database Connection Strings
A connection string is a key-value pair formatted string that specifies parameters for connecting to a data source such as a database. These parameters include information like the server (or file path in case of SQLite), authentication details, database name, etc.
According to Microsoft's documentation and general usage in .NET, including C# on the .NET platform, a semicolon (;) at the end of the connection string is not necessary. This means connection string "Data Source=MySqliteDatabase.db" is perfectly valid and sufficient.
Semicolons are used to separate different key-value pairs within the connection string. For example (not related to our code, just for illustration purpose)
string con = @"Data Source=MySqliteDatabase.db;Version=3;DateTimeFormat=Ticks;";Here, each parameter (Data Source, Version, DateTimeFormat) is separated by semicolons.
Here
SQLiteConnection MyConnection = new SQLiteConnection(ConnectionString); creates a SQLiteConnection object called MyConnection using the parameters given by the string ConnectionString.
ConnectionString contains the path to the database which we want to connect to. If no database with the name MySqliteDatabase.db exist at that location , a new SQlite file is created with the same name.
Another way to write it
SQLiteConnection MyConnection = new SQLiteConnection("Data Source=MySqliteDatabase.db");You can also provide absolute path to the SQLite database, As shown below. You can create the database at any location of your choice ,just give the full path.
String ConnectionString = @"Data Source=H:\C#_Sqlite_DB_Project\MySqliteDatabase.db"; //You can create the db at any location of your choice
SQLiteConnection MyConnection = new SQLiteConnection(ConnectionString);
Here @ is used to preserve backslashes.
MyConnection.Open(); //open a connection to the database.Open() establishes a connection to the database using the connection string provided when the connection instance was created. If the connection is already open, calling Open() again will throw an exception. It is a good practice to ensure the connection is closed before trying to open it again
using statement
You can rewrite the above code to use the using statement in C# so the resources are closed automatically.Here we are not closing the connection explicitly.
public static void Main()
{
  String ConnectionString = @"Data Source=MySqliteDatabase.db";           // MySqliteDatabase.db will be in "\bin\Debug\net8.0\MySqliteDatabase.db"

  using(SQLiteConnection MyConnection = new SQLiteConnection(ConnectionString)) // Create a SqliteConnection object called Connection
   {
      MyConnection.Open(); //open a connection to the database
   }
 }//End of Main()
Connecting to an existing SQLite Database Only
Here we will learn how to connect to an existing SQLite database on our disk without creating a new database using C#.
Whenever we use the following code
String ConnectionString = @"Data Source = SqliteDatabase.db";

using(SQLiteConnection MyConnection = new SQLiteConnection(ConnectionString)) // Create a SqliteConnection object called Connection
{
      MyConnection.Open(); //open a connection to the database
}
either a connection is created to the Database "SqliteDatabase.db" or a new SQLite database called "SqliteDatabase.db" is created on the disk by the C# program.
Sometimes we do not want to create a new database, but just want to connect with an existing database only. If the Database do not exists on the disk the code should inform the user that database do not exists instead of creating a new one.
To change this default behavior, we need to add the following key value pair "FailIfMissing = True" to our connection string.
So the connection string will be
"Data Source = SqliteDatabase.db;Version = 3;FailIfMissing = True";this will generate an exception, if SqliteDatabase.db is not present in the disk.
The partial code is shown below
String ConnectionString = "Data Source = SqliteDatabase.db;Version = 3;FailIfMissing = True"; //"FailIfMissing = True",
try
{
   using (SQLiteConnection MyConnection = new SQLiteConnection(ConnectionString)) //Create a SqliteConnection object called Connection
   {
       MyConnection.Open(); //open a connection to the database
   }
}
catch(Exception Ex )
{
   Console.WriteLine(Ex.Message);
}
Connection States in SQLite Database Access
In C#, the ConnectionState enumeration provides several states that indicate the current status of a SQLite database connection. Monitoring these states allows for better error handling and resource management in our database applications.
The Main states we need to consider are
Open
Closed
You can use the State property of the connection object to get the current state at any point during its lifecycle.
For example,
connection.Open();
Console.WriteLine("After opening: " + connection.State); // Open
You can also check
if (connection.State == System.Data.ConnectionState.Open)
{
   connection.Close();
   Console.WriteLine("After closing: " + connection.State); // Closed
}
Creating and adding data to SQLite Database using C#
Here we will learn to create a SQLite database programmatically using C# and Create a table inside our database and fill it with data.
The major steps involved in the process are the following
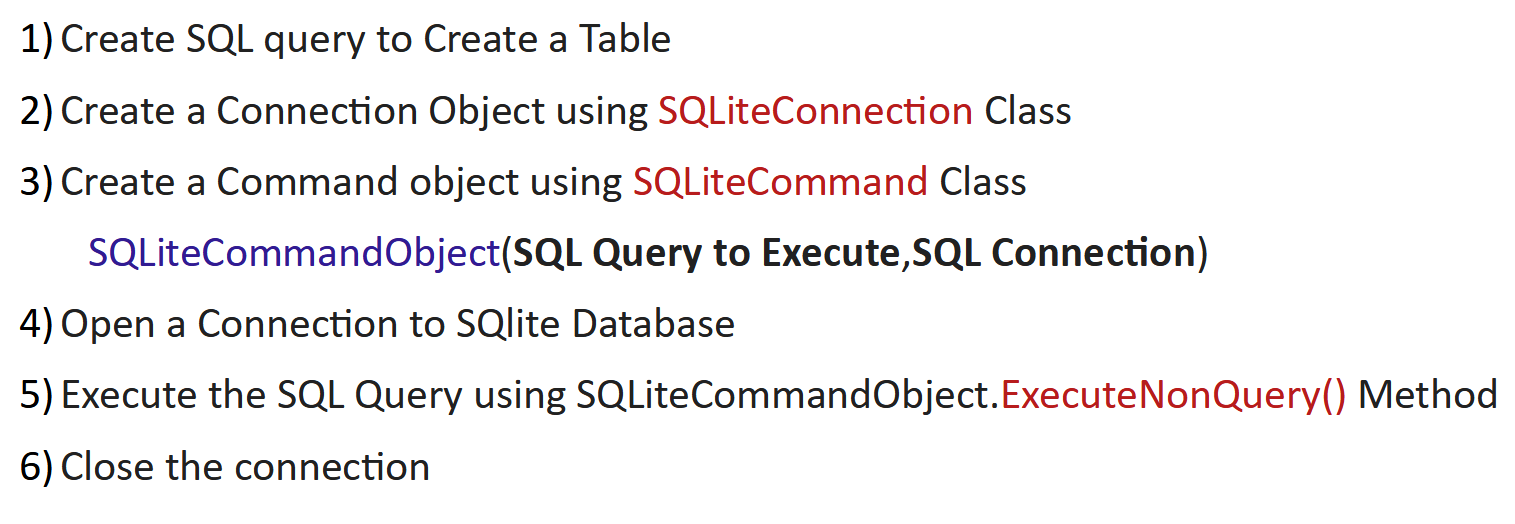
Creating a database happens automatically when you use the connection object SQLiteConnection to create a connection to a particular SQLite database, if that database exist it will open a connection with our C# program. if no SQLite database exists ,a new database of the name given in the connection string will be created at that location.
SQLiteConnection MyConnection = new SQLiteConnection(ConnectionString);The newly created database will be empty and we need to add data to it to make it functional.
Creating a table inside SQLite database
Here we will learn to create Tables inside the newly created SQLite database using C# language and populate the table with data. First we will create a SQL query to create the table we want and then execute the query using the methods and classes provided by the System.Data.SQLite namespace.
We are going to create the following table.

it will contain columns for
- Id is the PRIMARY KEY uses INTEGER
- Name uses VARCHAR (255 characters) datatype
- Age uses INTEGER
- DateOfBirth, uses TEXT and stores date in ISO8601 format (YYYY-MM-DD)
- Email uses VARCHAR (255 characters) datatype
- Price uses REAL datatype
as shown above.
So We will use the following SQL query to create the table and store it in a String Variable .
Here we are adding @ character before "CREATE TA..........." SQL query to make it span multiple lines.
//SQL Query to Create a Table for Storing data
String SQLQueryCreateTable = @"CREATE TABLE IF NOT EXISTS Customers(Id    INTEGER PRIMARY KEY,
                                                                   Name  VARCHAR,
                                                                   Age   INTEGER,
                                                                   DateOfBirth TEXT,
                                                                   Email VARCHAR,
                                                                   Price REAL)";
SQLiteCommand is a class in the System.Data.SQLite namespace that represents an SQL statement to execute against a SQLite database. It is part of the ADO.NET data access framework and provides methods and properties to execute SQL commands and retrieve data from a SQLite database.
Now create a SQLiteCommand object using the "SQL Query we want to execute" and the connection to the SQLite Database as shown below .Before running this, we have to open a connection to an existing database using SQLiteConnection as described in the previous section(above)
//Pseudocode
SQLiteCommand(SQL Query we want to execute , Connection to the SQLite Database);
//C# Code
SQLiteCommand MyCommand = new SQLiteCommand(SQLQueryCreateTable, MyConnection);
Once a SQLiteCommand object MyCommand is created we can use the .ExecuteNonQuery() method to execute SQL commands against our SQLite database.
ExecuteNonQuery() is used to execute SQL commands that do not return data. These commands typically modify data in the database, such as INSERT, UPDATE, DELETE statements, or SQL commands that alter database schema.
After execution, It returns an integer that represents the number of rows affected by the SQL command. Here we are creating a Table ,Number of modified rows will be zero.
MyConnection.Open(); //open a connection to the database
MyCommand.ExecuteNonQuery();           // Execute Create the Table SQL query
MyConnection.Close();//Close the connection with database
This will create a Table inside our database.
The partial code is available below. For full code use our GitHub repo, linked above in Source codes
//code to create table on sqlite database  in C#
class MySqliteDBCreateTable
{
  public static void Main()
  {
    String ConnectionString = @"Data Source=MySqliteDatabase.db"; // MySqliteDatabase.db will be in "\bin\Debug\net8.0\MySqliteDatabase.db"
    //Create a Table to Store data
    String SQLQueryCreateTable = @"CREATE TABLE IF NOT EXISTS Customers(Id    INTEGER PRIMARY KEY,
                                                                               Name  VARCHAR,
                                                                               Age   INTEGER,
                                                                               DateOfBirth TEXT,
                                                                               Email VARCHAR,
                                                                               Price REAL)";
    SQLiteConnection MyConnection = new SQLiteConnection(ConnectionString); //Create a SqliteConnection object called Connection

    SQLiteCommand MyCommand = new SQLiteCommand(SQLQueryCreateTable, MyConnection);
    MyConnection.Open(); //open a connection to the database

    var RowsChanged = MyCommand.ExecuteNonQuery();           // Execute Create the Table SQL query

    Console.WriteLine($"No of Rows Changed = {RowsChanged}");//rows changed =0,since we are creating a table


    MyConnection.Close();//Close the connection with database

  }//End of Main()
 }//End of Class
}//End of namespace
Another way to write the above code with the using statement is shown below. Here resources are automatically closed. For full code use our GitHub repo, linked above in Source codes
//code to create table on sqlite database  in C#,resources closed automatically with using statement
class MySqliteDBCreateTable
{
  public static void Main()
  {
    String ConnectionString = @"Data Source=MySqliteDatabase.db"; // MySqliteDatabase.db will be in "\bin\Debug\net8.0\MySqliteDatabase.db"

    //Create a Table to Store data
    String SQLQueryCreateTable = @"CREATE TABLE IF NOT EXISTS Customers(Id    INTEGER PRIMARY KEY,
                                                                               Name  VARCHAR,
                                                                               Age   INTEGER,
                                                                               DateOfBirth TEXT,
                                                                               Email VARCHAR,
                                                                               Price REAL)";
     using (SQLiteConnection MyConnection = new SQLiteConnection(ConnectionString)) //Create a SqliteConnection object called Connection
     {
       MyConnection.Open(); //open a connection to the database

       //Create the table
       using (SQLiteCommand MyCommand = new SQLiteCommand(SQLQueryCreateTable, MyConnection))//Create a command object
       {
         var RowsChanged = MyCommand.ExecuteNonQuery();           // Execute Create the Table SQL query
         Console.WriteLine($"No of Rows Changed = {RowsChanged}");//rows changed =0,since we are creating a table
       }
     }

  }//End of Main()
 }//End of Class
}//End of namespace
You can use DB Browser to check your Database after running the code. You can see that the table Customers is created but it is unpopulated.

if you look under Browse Data Tab of DB browser ,you will find the columns empty.

Inserting Data in to a SQLite Database using C#
Once we have created the table inside the SQLite dB, it is time to insert some data into the SQLite database using C#.first thing we should do is to construct a SQL query to insert the data into our database.
Here we will use the SQL INSERT command. Unlike the usual SQL INSERT command that would look something like this
INSERT INTO Customers (Name, Age, DateOfBirth, Email, Price) VALUES ('John Doe', 30, '1980-04-01', 'johndoe@email.com', 234.68)Here, we will be using parameterized queries, allowing us to safely pass parameters into SQL commands to prevent SQL injection attacks.
string SQLQueryInsertData = "INSERT INTO Customers (Name,Age,DateOfBirth,Email,Price) VALUES (@NameParam,@AgeParam,@DateOfBirth,@Email,@Price)";Here we will assign our new SQL Query to the InsertDataCommand object as shown below.
SQLiteCommand InsertDataCommand = new SQLiteCommand( SQLQueryInsertData, MyConnection); //create a SQLite Command object to insert data Then we will add the values that we want to insert into the sqlite database using .Parameters.AddWithValue() method.
This method will replace the parameter (Eg @Name) with the corresponding value (Eg "Johnny Dove").
Once all the values for one row have been loaded into the InsertDataCommand object,
We call .ExecuteNonQuery(); method that will insert the new values into the Sqlite 3 database.
The method will return the value 1,indicating that one row has been effected.
SQLiteCommand InsertDataCommand = new SQLiteCommand( SQLQueryInsertData, MyConnection); //create a SQLite Command object to insert data

//Values added to parameters
InsertDataCommand.Parameters.AddWithValue("@NameParam", "Johnny Dave");
InsertDataCommand.Parameters.AddWithValue("@AgeParam", 60);
InsertDataCommand.Parameters.AddWithValue("@DateOfBirth", "1984-04-01"); //Sqlite Supports ISO 8601 date format YYYY-MM-DD
InsertDataCommand.Parameters.AddWithValue("@Email", "johnnydoe@email.com");
InsertDataCommand.Parameters.AddWithValue("@Price", 25324.68);

RowsChanged = InsertDataCommand.ExecuteNonQuery();
Console.WriteLine($"No of Rows Changed = {RowsChanged}");
Here is how the code will look like. Database connection string and create table SQL statement omitted in the below code for brevity, use full code from GitHub
//Code for demo purpose only,some parts omitted,use github code
//Code to add data to sqlite3 databse table using c#
public static void Main()
{

   //database connection string and create table SQL statement omitted
   SQLiteConnection MyConnection = new SQLiteConnection(ConnectionString); //Create a SqliteConnection object called Connection

   SQLiteCommand CreateTableCommand = new SQLiteCommand(SQLQueryCreateTable, MyConnection); //create a command object to create a table
   MyConnection.Open(); //open a connection to the database
   //Create a table if it does not exist
   CreateTableCommand.ExecuteNonQuery();           // Execute Create the Table SQL query


   // Insert some data into the table
   string  SQLQueryInsertData = "INSERT INTO Customers (Name,Age,DateOfBirth,Email,Price) VALUES (@NameParam,@AgeParam,@DateOfBirth,@Email,@Price)";

   SQLiteCommand InsertDataCommand = new SQLiteCommand( SQLQueryInsertData, MyConnection); //create a SQLite Command object to insert data

   //Values added to parameters
   InsertDataCommand.Parameters.AddWithValue("@NameParam", "Johnny Dave");
   InsertDataCommand.Parameters.AddWithValue("@AgeParam", 60);
   InsertDataCommand.Parameters.AddWithValue("@DateOfBirth", "1984-04-01"); //Sqlite Supports ISO 8601 date format YYYY-MM-DD
   InsertDataCommand.Parameters.AddWithValue("@Email", "johnnydoe@email.com");
   InsertDataCommand.Parameters.AddWithValue("@Price", 25324.68);

   RowsChanged = InsertDataCommand.ExecuteNonQuery(); //execute the SQL query to add values to sqlite database


   MyConnection.Close();//Close the connection with database
}//End of Main()
After running the code ,you can check the inserted values using DB Browser.

Here is the rewrite of the code for inserting data to sqlite database with using statement.
//Partial code ,check github for full code
class MySqliteDBInsertDataUsing
{
   public static void Main()
   {
       String ConnectionString = @"Data Source=MySqliteDatabase.db";
       //Create a Table to Store data
       String SQLQueryCreateTable = @"CREATE TABLE IF NOT EXISTS Customers(Id    INTEGER PRIMARY KEY,
                                                                               Name  VARCHAR,
                                                                               Age   INTEGER,
                                                                               DateOfBirth TEXT,
                                                                               Email VARCHAR,
                                                                               Price REAL)";
       using (SQLiteConnection MyConnection = new SQLiteConnection(ConnectionString)) //Create a SqliteConnection object called Connection
       {
           MyConnection.Open(); //open a connection to the database
           using (SQLiteCommand CreateTableCommand = new SQLiteCommand(SQLQueryCreateTable, MyConnection))
           {
               CreateTableCommand.ExecuteNonQuery();           // Execute,Create the Table SQL query

           }
           // Insert some data into the table
           string SQLQueryInsertData = "INSERT INTO Customers (Name,Age,DateOfBirth,Email,Price) VALUES (@NameParam,@AgeParam,@DateOfBirth,@Email,@Price)";
           using (SQLiteCommand InsertDataCommand = new SQLiteCommand(SQLQueryInsertData, MyConnection))
           {
               InsertDataCommand.Parameters.AddWithValue("@NameParam", "Johnny Austin Dave");
               InsertDataCommand.Parameters.AddWithValue("@AgeParam", 68);
               InsertDataCommand.Parameters.AddWithValue("@DateOfBirth", "1989-04-01"); //Sqlite Supports ISO 8601 date format YYYY-MM-DD
               InsertDataCommand.Parameters.AddWithValue("@Email", "johastinnydoe@email.com");
               InsertDataCommand.Parameters.AddWithValue("@Price", 324.68);
           }
       }
   }//End of Main()
}//End of Class
Viewing the parameters send to the SQLite database
You can view the parameter values that are updated into the sqlite database using the below code snippet. this could be quite helpful during debugging.
Console.WriteLine(InsertDataCommand.Parameters["@NameParam"].Value);//Shows the value inside the parameter
Console.WriteLine(InsertDataCommand.Parameters["@AgeParam"].Value);//Shows the value inside the parameter
Console.WriteLine(InsertDataCommand.Parameters["@DateOfBirth"].Value);//Shows the value inside the parameter
Console.WriteLine(InsertDataCommand.Parameters["@Email"].Value);//Shows the value inside the parameter
Console.WriteLine(InsertDataCommand.Parameters["@Price"].Value);//Shows the value inside the parameter
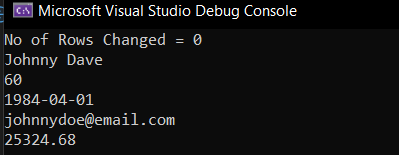
You can also use a foreach loop to view all the parameters passed onto the sqlite3 database. Here InsertDataCommand name of our command object
foreach (SQLiteParameter parameter in InsertDataCommand.Parameters) //here InsertDataCommand name of our command object
{
   Console.WriteLine($"{parameter.ParameterName}: {parameter.Value}");
}
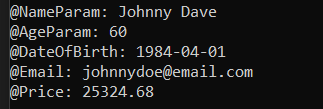
The SQLiteParameter class is part of the System.Data.SQLite namespace and is used to represent a parameter in an SQL command when interacting with a SQLite database.
SQLiteParameter is used to define parameters that can be passed to SQL commands like INSERT, UPDATE, DELETE, or SELECT.
Each parameter has a name (e.g., @id, @name) that is used in the SQL command to refer to the parameter. This name must match the name in the command text.
The Value property holds the actual data that will be passed to the command.
Reading Data from SQLite Database using C#
So in the previous examples we have learned how to create a table and how to add data to a sqlite3 database using C#. In this section we will learn how to read the rows and columns of a sqlite3 database using the C# language and display it on the terminal.
To read the data from an SQLite database we have to use SQLiteDataReader class provided by the System.Data.SQLite namespace.
SQLiteDataReader is derived from the DbDataReader class, which is part of the ADO.NET framework. It allows for efficient reading of data from an SQLite database using forward only cursor which means that you can only read the data in one direction, from the first record to the last.
Before using the examples in this section, you should ensure that your sqlite3 database contains some data which we can read.
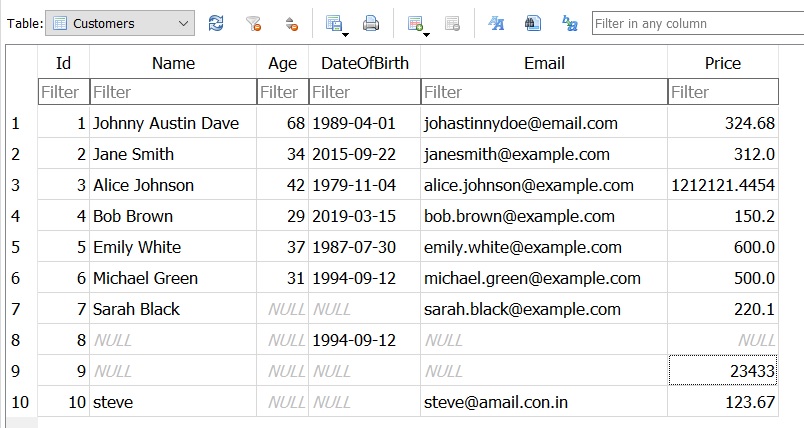
Above table shows the SQLite database we are going to read from. Notice that some cells are NULL.
Here is the partial code on how to read data from the SQLite database using C# ,explanations are below. Please use the full code from GitHub.
//Partial Code,check full code on github,link above
String SQLQuerySelectAll = "SELECT * FROM Customers";
using (SQLiteConnection MyConnection = new SQLiteConnection(ConnectionString)) // Create a SqliteConnection object called Connection
{
   MyConnection.Open();              //open a connection to sqlite 3 database

   // Make sure that Database is populated with some data before running this code

   using (SQLiteCommand MyCommand = new SQLiteCommand(SQLQuerySelectAll, MyConnection)) //Create a new command object using sql query and connection object
   {
       using (SQLiteDataReader MyDataReader = MyCommand.ExecuteReader())
       {
           while(MyDataReader.Read())
           {
               int Id      = MyDataReader.GetInt32(0); // Index 0 for the first column
               string Name = MyDataReader.GetString(1); // Index 1 for the second column
               int Age     = MyDataReader.GetInt32(2);
               string DOB  = MyDataReader.GetString(3);
               string Email= MyDataReader.GetString(4);
               float Price = MyDataReader.GetFloat(5);
               Console.WriteLine($"{Id} {Name} {Age} {DOB} {Email} {Price}");
           }
       }
   }
The first steps are similar to the previous example. it involves
Create a Connection to the SQLite database using SQLiteConnection class (Here MyConnection )
Open the connection using .Open() Method, Here MyConnection.Open();
Create a Command Object using SQL Query string and Connection Object
After which we create a SQLiteDataReader object called MyDataReader which will receive the data from the MyCommand.ExecuteReader().
using (SQLiteDataReader MyDataReader = MyCommand.ExecuteReader())MyCommand.ExecuteReader() is a method called on an instance of the SQLiteCommand class . It executes the SQL query against a database and returns a data reader that allows you to read the results of that query.
We can then use the .Read() Method of SQLiteDataReader to read the rows (records) in MyDataReader.
The Read() method of the SQLiteDataReader class is used to advance the reader to the next row(record) in the result set obtained from a database query. It returns a boolean value that indicates whether there are more rows to read.
If there is a next row, it returns true, allowing you to access the data in that row. If there are no more rows (i.e., the reader has reached the end of the result set), it returns false.
while(MyDataReader.Read())
{
  int Id      = MyDataReader.GetInt32(0); // Index 0 for the first column
  string Name = MyDataReader.GetString(1); // Index 1 for the second column
  int Age     = MyDataReader.GetInt32(2);
  string DOB  = MyDataReader.GetString(3);
  string Email= MyDataReader.GetString(4);
  float Price = MyDataReader.GetFloat(5);
 }
We have to use different methods to get different data types stored in the row. In our case, our record have the following structure.

First column is Id which is of int datatype, So we use the MyDataReader.GetInt32(0); method to get the Id value. Here 0 is the column Index or ordinal
Second column is Name which is a string datatype,So we use the MyDataReader.GetString(1); method to get the Name value and store it in a string.Here 1 is the column Index or ordinal.
Third column is Age which is of int datatype, So we use the MyDataReader.GetInt32(2); method to get the Age value. Here 2 is the column Index or ordinal.
and finally we use the MyDataReader.GetFloat(5); to read the Price Column which contains a float value. Here 5 is the column Index or ordinal.
Here we are giving the SQL query SELECT * FROM Customers, that means that we have to provide methods to read all the columns returned.
If the SQL query is SELECT Age, Price FROM Customers, we only have to provide methods to read two columns Age and Price only
You can also access the column values of the SQLite database by directly calling the column name as shown below. column names are case insensitive For Example price and Price are same.
while(MyDataReader.Read())
{
   int Id       = Convert.ToInt32(MyDataReader["Id"]);
   string Name  = MyDataReader["name"].ToString();
   int Age      = Convert.ToInt32(MyDataReader["Age"]);
   string DOB   = MyDataReader["DateofBirth"].ToString();
   string Email = MyDataReader["email"].ToString();
   Double Price = Convert.ToDouble(MyDataReader["price"]);
   Console.WriteLine($"{Id} {Name} {Age} {DOB} {Email} {Price}");
}
here we are using the MyDataReader["Column Name"] format to access the values. Here we have to convert the retrieved values to appropriate datatypes before using as shown below.
string DOB   = MyDataReader["DateofBirth"].ToString();
Double Price = Convert.ToDouble(MyDataReader["price"]);
The output of the program can be seen below.

Handling Null Values in the SQLite database
In this section, we will learn how to handle NULL values while reading data from an SQLite database using SQLiteDataReader Class.
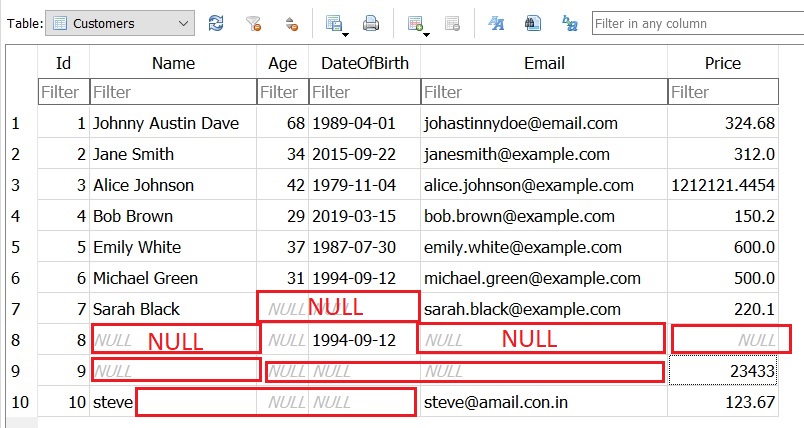
As you can see in the above image ,we have a lot of empty cells in our SQLite database that are filled with null values. If we tried to read the data using our above program it will result in the following error
" Unhandled exception. System.InvalidCastException: Object cannot be cast from DBNull to other types. at System.DBNull.System.IConvertible.ToInt32(IFormatProvider provider) "as shown in the below image.

Here an exception had occurred because the Convert.ToInt32() function had encountered a null value while trying to read the Age Column. Normally Convert.ToInt32() function can convert null value into zero here we had encountered a DBNull.
null VS DBNull
In C#,
null and DBNull are two distinct concepts used in different contexts, particularly when dealing with data and databases.
null is a literal in C# that represents the absence of a value. It can be assigned to any reference type (like objects, strings, etc.) and nullable value types while DBNull is a singleton class provided by the .NET Framework, specifically used to represent a database null value.
DBNull explicitly indicates that a database field is null, representing an absence of data in a database context. To check if a database value is null, you need to compare it to DBNull.Value
To make sure that DBNull is properly handled,We can use a ternary operator to check wheter the read value is DBNull or not as shown below.
string Name = MyDataReader["name"] == DBNull.Value ? "NULL" : MyDataReader["name"].ToString();if the value read from the database is DBNull ,a string NULL is assigned to Name variable.
Rest of the values are handled as shown below.
int Age      = MyDataReader["Age"] == DBNull.Value ? -1 : Convert.ToInt32(MyDataReader["Age"]);
string DOB   = MyDataReader["DateofBirth"] == DBNull.Value ? "NULL" : MyDataReader["DateofBirth"].ToString();
string Email = MyDataReader["Email"] == DBNull.Value ? "NULL" : MyDataReader["Email"].ToString();
double Price = MyDataReader["Price"] == DBNull.Value ? -1 : Convert.ToInt32(MyDataReader["Price"]);
If you run this program, The output will be
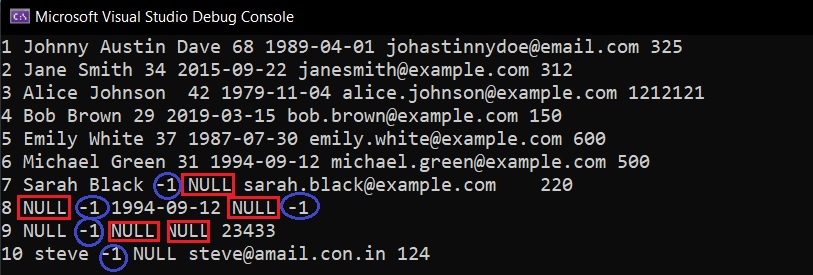
Here null values are replaced by -1 and NULL .
Updating a Row in a SQLite Database using C#
Here we will learn how to update one or more fields/cells on a SQLite database record /row using C#.
Updating a database record on a SQLite database involves using the SQLiteCommand class to execute an UPDATE SQL statement. Here most of the work is done by the SQL statement.
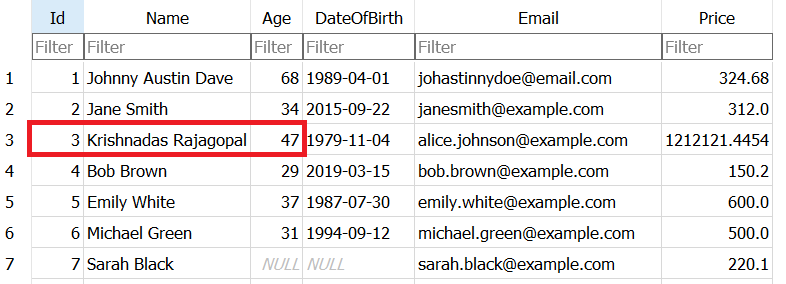
We will update the Name and Age values in the Customers Table present in our SQLite Table identified by the Id =3.
The below image shows the database fields in the SQLite that will be updated by our C# program.
The SQL Query we will be using to update the record is
UPDATE Customers SET Name = @name, Age = @age WHERE Id = @id
We will first open a connection to the database and create a SQLiteCommand object that will execute the above SQL query. We will get the information from the user and then use that to update the values in the SQLite database.
The partial code for updating the SQLite database using C# is shown below. Full code in GitHub
//Partial code
Console.WriteLine("\nEnter the name to be updated - ");
NameToBeUpdated = Console.ReadLine();
Console.WriteLine("Enter the Age  to be updated - ");
AgeToBeUpdated  = Convert.ToInt32(Console.ReadLine()) ;
String SQLQueryUpdate = "UPDATE Customers SET Name = @name, Age = @age WHERE Id = @id";
//Code for updating the sqlite database
using (SQLiteCommand UpdateCommand = new SQLiteCommand(SQLQueryUpdate, MyConnection)) //Create a new command object using sql query and connection object
{
   UpdateCommand.Parameters.AddWithValue("@name", NameToBeUpdated);
   UpdateCommand.Parameters.AddWithValue("@age", AgeToBeUpdated);
   UpdateCommand.Parameters.AddWithValue("@id", 3);
   UpdateCommand.ExecuteNonQuery();
}
If you run the program, Program will display existing Name and Age in the SQLite database ,then it will prompt the user for a new name and age. Updated Data will be written to the SQLite database.
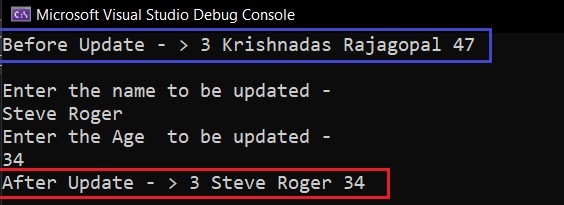
If you open the database using DBbrowser, you can see the updated data inside the database at Id = 3.

Deleting data in a SQLite Database using C#
To delete a record in SQLite database using C#, you'll follow a process similar to updating a record. You'll use the SQLiteCommand class to execute a DELETE SQL statement.
Here we will delete the whole row/record in our SQLite database whose Id =33 using C#. Here that record corresponds to Jane Smith, Age 34,As shown in image below

Now we will run an SQL command that will take id as parameter and delete the record. The SQL command for deleting the record from SQLite is shown below.
DELETE FROM Customers WHERE Id = @idWe then execute the above command using SQLiteCommand Object as shown in the below code snippet.
using (SQLiteCommand UpdateCommand = new SQLiteCommand(SQLQueryUpdate, MyConnection)) //Create a new command object using sql query and connection object
{
  UpdateCommand.Parameters.AddWithValue("@id", 33); //here id = 33 for jane smith ,age 33

  UpdateCommand.ExecuteNonQuery();
}
Once the program is executed the record corresponding to id =33 is deleted. You can also find that number of records have decreased to 3 from 4 .

- Log in to post comments
