

In this Python tutorial, We will learn how to create a table widget for displaying tabular data using Tkinter and ttkbootstrap GUI Library.
If you're building a graphical user interface (GUI) in Python, you're probably familiar with Tkinter, the standard library for creating windows, buttons, and other UI components. However, when it comes to displaying table like data, Tkinter doesn't offer a native widget for tables. This is where the ttkbootstrap library comes into play.
Here, we will explore how to create a table widget using the Tableview class from the ttkbootstrap library and learn to work with methods for adding rows, inserting records, and even deleting records from the table.

Once the basic table operations are covered , We will learn to integrate them into a fully functional Tkinter app as shown in the below figure.

By creating a window that allows users to add, view, and delete records from the table, you can create a simple but powerful database-like interface. This type of application could be used for inventory management, task lists, or any other system that requires tabular data representation.
If you are new to ttkbootstrap library,
Do check our Tutorial on a Simple and Easy introduction to creating GUI widgets using ttkbootstrap tkinter library
Contents
- Source Codes
- Installing ttkbootstrap
- Creating Tables using Tableview Class
- Explanation of the Code
- Adding a Row into the tkinter (ttkbootstrap) Table
- Inserting a Single Record
- Inserting Multiple Records
- Deleting a Row into the tkinter (ttkbootstrap) Table
- Removing all the Rows from the Table
- Tkinter App to Create and Delete Records from Table
Source Codes
Download the Python/tkinter Source codes for Creating table as Zip File
Browse the Python/tkinter Source codes on our Github Repo
Installing ttkbootstrap
Now before you start ,you have to install the ttkbootstrap library using pip installer. This can be easily done by going to the command line and typing.
pip install ttkbootstrap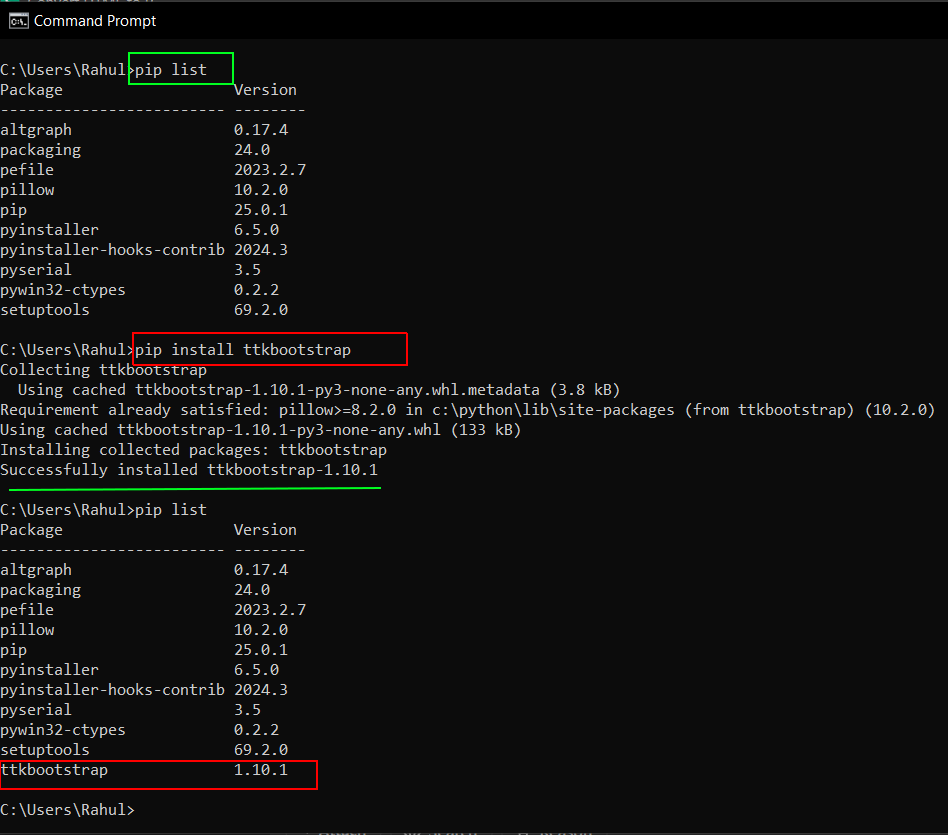
You can use the pip list command to check whether the ttkbootstrap library is installed or not.
Creating Tables using Tableview Class
The ttkbootstrap.tableview.Tableview class in the ttkbootstrap library designed to create a table-like structure in your Tkinter application with modern styling.
Tableview class allows you to display data in a tabular format. It behaves like a table, where each row represents a data entry, and each column represents a different field of that data entry. It inherits from the Frame class, so it behaves like a container widget in Tkinter. You can add Tableview to any other Tkinter widget, such as Window, Frame, or other containers.
The ttkbootstrap.tableview.Tableview class is built on top of the ttk.Treeview widget from Tkinter.The Treeview widget is a part of the ttk (Themed Tkinter) module, which allows for the creation of tree-like structures or tables. It can show hierarchical data, such as directories and files, or tabular data.
Major Features
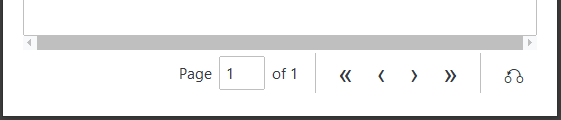
A Tableview object has pagination option for displaying large datasets with 1000's of rows. The widget splits the datasets into multiple rows which will be loaded on demand when the user interacts with the page. This helps in fast loading of the datasets into your tkinter program offering a smooth experience.
All columns in the table are sortable. Clicking on a column header will toggle the sort order between "ascending" and "descending."
It also comes with a built in search function for searching through your datasets
Creating a Simple Table using Tableview
Now we will create a very simple table to display some data on a tkinter window.
import ttkbootstrap as ttk
from ttkbootstrap.tableview import Tableview
from ttkbootstrap.constants import *
root = ttk.Window()
root.title('Window Name') # Window Name
colors = root.style.colors
#Name of the Columns
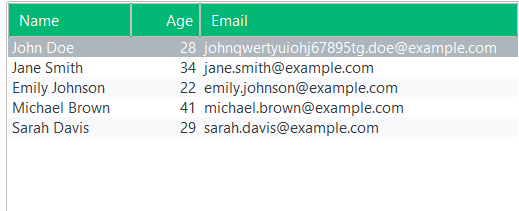
column_headers = [ "Name" ,"Age"," Email"]
#Data to be added to the rows
row_data = [
('John Doe', 28, 'johnqwertyuiohj67895tg.doe@example.com'),
('Jane Smith', 34, 'jane.smith@example.com'),
('Emily Johnson', 22, 'emily.johnson@example.com'),
('Michael Brown', 41, 'michael.brown@example.com'),
('Sarah Davis', 29, 'sarah.davis@example.com'),
]
#Creating the table
data_table = Tableview(
master = root,
coldata = column_headers,
rowdata = row_data,
pagesize = 5,
autofit = True,
paginated = True,
searchable = True,
bootstyle = SUCCESS,
stripecolor = (colors.light, None),
)
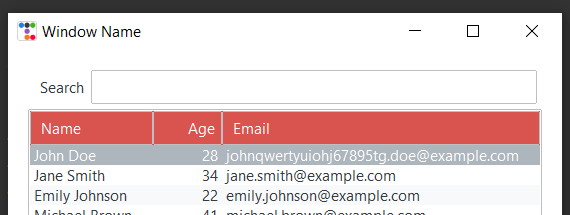
data_table.pack(fill = BOTH, expand = YES, padx = 15, pady = 15)
root.mainloop()
On running this code we will get the following window.

Code Explanation
import ttkbootstrap as ttk
from ttkbootstrap.tableview import Tableview
from ttkbootstrap.constants import *
root   = ttk.Window()
root.title('Window Name') # Window Name
Here we are importing all the required modules and creating a window.
colors = root.style.colorsIn ttkbootstrap, root.style.colors is used to access the color palette of the theme you're using for your application. The style.colors attribute provides a dictionary of predefined colors that are based on the Bootstrap color palette, which can be used for styling your widgets or UI elements.
This used to set color for the stripecolor attribute in Tableview
#Name of the Columns
column_headers = [ "Name" ,"Age"," Email"]
This defines the headers for the columns in the table. The table will display three columns: "Name", "Age", and "Email".
Another way for specifying Column headers is to use a list of dictionaries as shown below.Each dictionary contains keys and values that control how the column header is displayed and behaves.
column_headers = [
                   {"text": " Name" , "stretch": True, "anchor": "center"},
                   {"text": " Age"  , "stretch": True, "anchor": "center"},
                   {"text": " Email", "stretch": True, "anchor": "center"},
]"text"-> This key defines the text displayed in the header of the column. For Eg "text": " Name" means the column header will show the text "Name".
The "stretch" key determines whether the column should expand to fill available space. If True, the column will expand to occupy any remaining space when the table is resized or when there is extra space available. If False, the column will not expand, and its size will remain fixed.
The "anchor" key specifies the alignment of the text within the column header.
#Data to be added to the  rows
row_data = [
               ('John Doe',      28, 'johnqwertyuiohj67895tg.doe@example.com'),
               ('Jane Smith',    34, 'jane.smith@example.com'),
               ('Emily Johnson', 22, 'emily.johnson@example.com'),
               ('Michael Brown', 41, 'michael.brown@example.com'),
               ('Sarah Davis',   29, 'sarah.davis@example.com'),
           ]
This is the actual data that will be displayed in the rows of the table. Each tuple contains the name, age, and email of a person.
#Creating the table
data_table  = Tableview(
                        master     = root,
                        coldata    = column_headers,
                        rowdata    = row_data,
                        pagesize   = 5,     #5 rows /page
                        height     = 3,     #display only 3 rows out of 5 ,scroll down for the rest
                        autofit    = True,
                        paginated  = True,
                        searchable = True,
                        bootstyle  = SUCCESS,
                        stripecolor = (colors.light, None),
                       )
Here we create the actual table using Tableview().
coldata = column_headers: Passes the column headers to the table.
rowdata =row_data: Passes the actual data to the table.
pagesize = 5: Limits the number of rows displayed on a page to 5 (pagination).Here we only has 5 rows ,so all rows will be shown in the same page.
autofit=True: Automatically adjusts column width to fit the content.
paginated=True: Enables pagination, so only a fixed number of rows (5 in this case) are displayed at a time, and you can navigate through pages.
searchable =True: Adds a search bar to the table for filtering the rows.

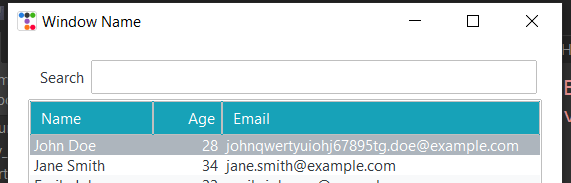
bootstyle = SUCCESS: This sets the table's style to "SUCCESS," which is a pre-defined style in ttkbootstrap (usually green, indicating success).
The full list of styles can be found from the ttkbootstrap page.
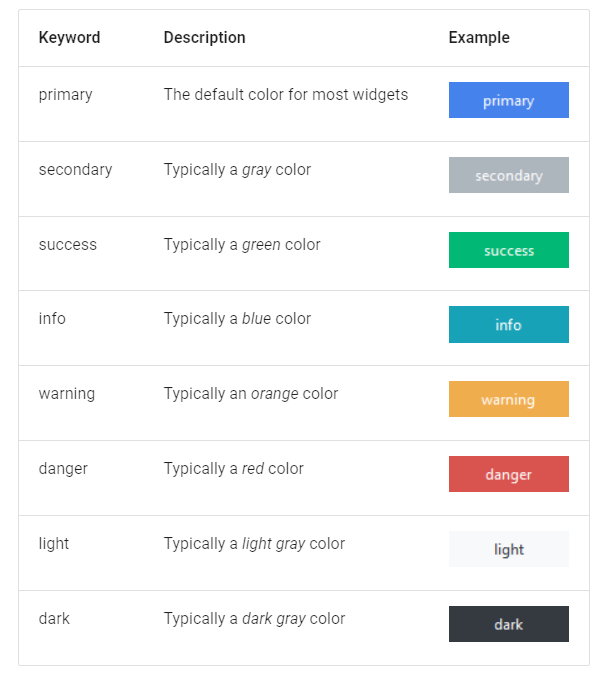
Make sure that all letters are in capital.
For bootstyle = DANGER:
For bootstyle = INFO:
stripecolor = (colors.light, None): This adds alternating row colors (striped rows) for better readability using the light color from the style's color palette.
The stripecolor option in ttkbootstrap is used to create striped rows in a widget like Tableview. This option allows you to define alternating row colors for better readability. In our case Odd numbered rows will be using the light colored palette.
data_table.pack(fill = BOTH, expand = YES, padx = 15, pady = 15)fill = BOTH: This argument specifies how the widget should expand to fill the available space.BOTH means the widget will expand in both the horizontal (width) and vertical (height) directions. In other words, the data_table will fill the entire parent container (root window or frame) both horizontally and vertically.
You can also use:
- X -> Fill horizontally (width).
- Y ->Fill vertically (height).
- NONE -> Don't fill at all (default behavior).
expand = YES
This argument determines whether the widget should expand to take up any extra space available in the parent container. This is useful when you want your widget to adjust its size as the window or parent container is resized.
padx = 20: adds horizontal padding (space) around the widget and pady adds vertical padding (space) around the widget.
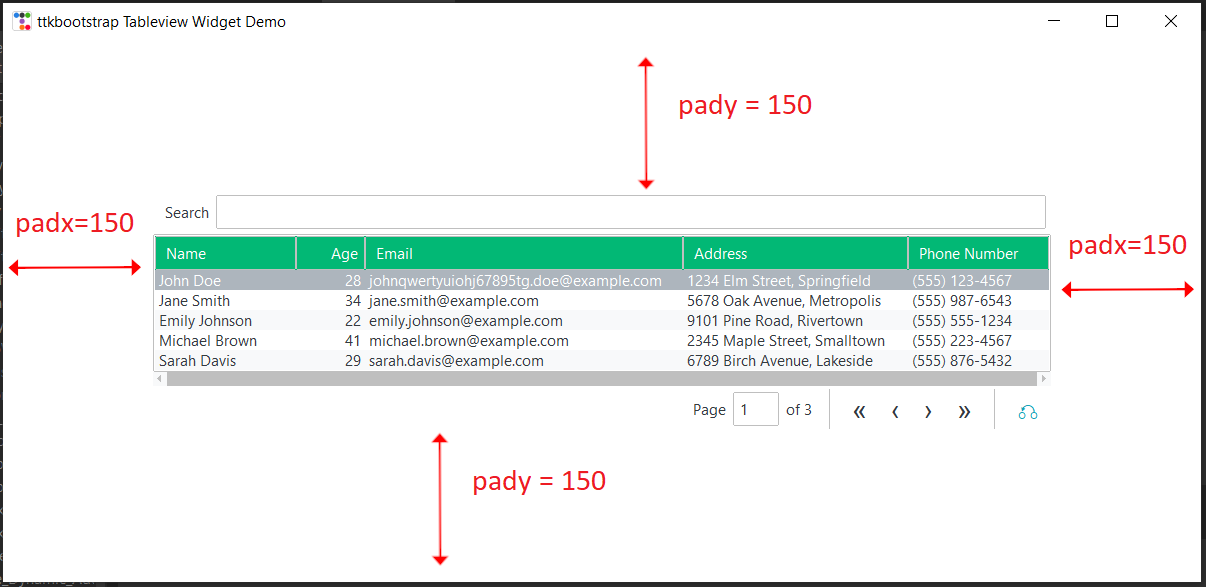
A very exaggerated view of the effect of using pady =150 and padx =150
data_table.pack(fill = BOTH, expand = YES, padx = 150, pady = 150)
Adding a Record into the tkinter Table
To add a new record or row into the table you can use either the
insert_row( index, values=[]) -> For inserting Single Row
insert_rows(index, rowdata) -> For inserting Multiple Rows
Inserting a Single Row into the Table
Here we will learn to insert a single row/record into our table using the insert_row() method provided by the ttkbootstrap.tableview.Tableview class.
Below Code shows the relevant bits for adding a single row to your table
#add a single row into the table
#Partial code, Full Code in Github
column_headers = [
                   {"text": " Name"            , "stretch": True, "anchor": "center"},
                   {"text": " Age"             , "stretch": True, "anchor": "center"},
                   {"text": " Email"           , "stretch": True, "anchor": "center"},

#Some original data                                 ]
row_data = [
               ('John Doe',      28, 'johnqwertyuiohj67895tg.doe@example.com'),
               ('Jane Smith',    34, 'jane.smith@example.com'),
           ]

#create table
data_table  = Tableview( ...all the arguments )

# add a single row
new_row_data = ('New John Doe',280, 'New.doe@example.com') # has to be a tuple ,not a list
#data_table.insert_row(index = 0,values = new_row_data)     #insert data to the first row row 0
data_table.insert_row(index = 'end',values = new_row_data)  #insert data to the last row ,index = 'end'
data_table.load_table_data() # call Tableview.load_table_data() to update the current view.
data_table.pack(..all the required arguments)
root.mainloop()
On running the code you will get the following output.
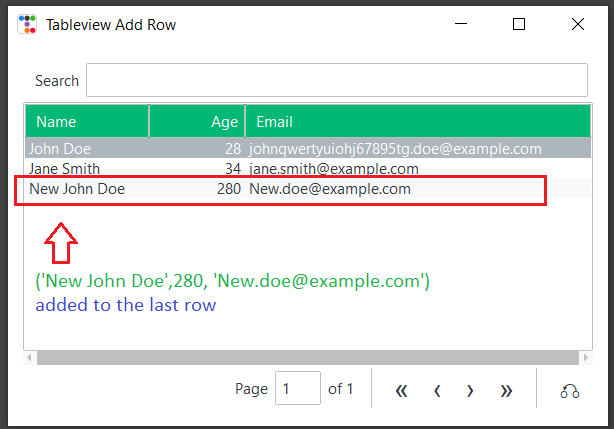
new_row_data = ('New John Doe',280, 'New.doe@example.com') # has to be a tuple ,not a listFirst we create a tuple that corresponds to the column header of our table. This will be the row that we will be adding to our table.
data_table.insert_row(index = 'end',values = new_row_data) #insert data to the last row ,index = 'end'Here index corresponds to the position at which we will be inserting our record .Here index = 'end' which means record will be inserted at the end.
You can also give index = 0 to insert your row in the first row ,and index = 1 will insert data into the second row
data_table.insert_row(index = 0,values = new_row_data) #insert data to the first row ,index = 0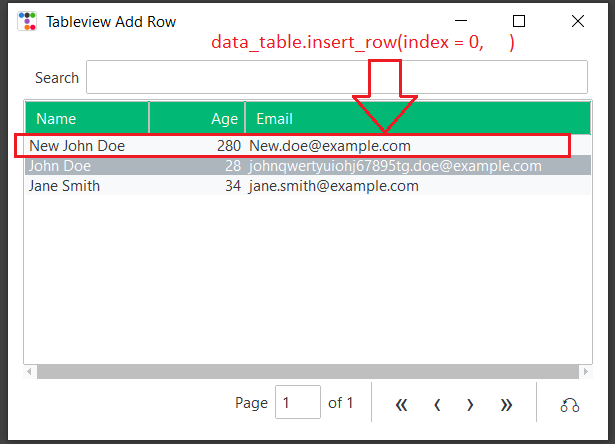
After inserting the data we should call the
data_table.load_table_data() call Tableview.load_table_data() to update the current view.in order to update the current view other wise the table will not show the newly added row.
Inserting Multiple Rows into the tkinter Table
Inserting Multiple Rows is quite similar to the previous one ,Here we will be using the insert_rows(index, rowdata) method and we will need multiple tuples.
The Partial code is shown below.
# add a Multiple rows
new_row_data = [('New John Doe 1 ',280, 'New.doe_1@example.com'),
               ('New John Doe 2 ',380, 'New.doe_2@example.com'),
               ('New John Doe 3 ',480, 'New.doe_3@example.com'),
               ('New John Doe 4 ',580, 'New.doe_4@example.com'),

               ]# has  a list

data_table.insert_rows(index = 0,rowdata = new_row_data)       #insert data to the first row row 0
#data_table.insert_rows(index = 'end',rowdata = new_row_data)  #insert data to the last row ,index = 'end'
data_table.load_table_data() # call Tableview.load_table_data() to update the current view.
On running this you will get

Removing a Record from the tkinter Table
Deleting the rows from the table can be done by using delete_row (index ) method. Here index refers to the index of the row to be deleted.
data_table.delete_row(index = 0) #delete first rowdata_table.delete_row(index = 1) #delete second rowRemoving the Entire Records from the tkinter Table
Sometimes we need to remove the entire rows present in our table in a single go, for that purpose you have to use the unload_table_data() method .
In our case we can use the following code snippet to completely purge all data from our table in one go.
data_table.unload_table_data()Tkinter App to Create and Delete Rows from Table
Now we will build a Simple tkinter/ttkbootstrap GUI app to add and delete records from a Table using the add_row() method and delete_row() method provided by the Tableview class.
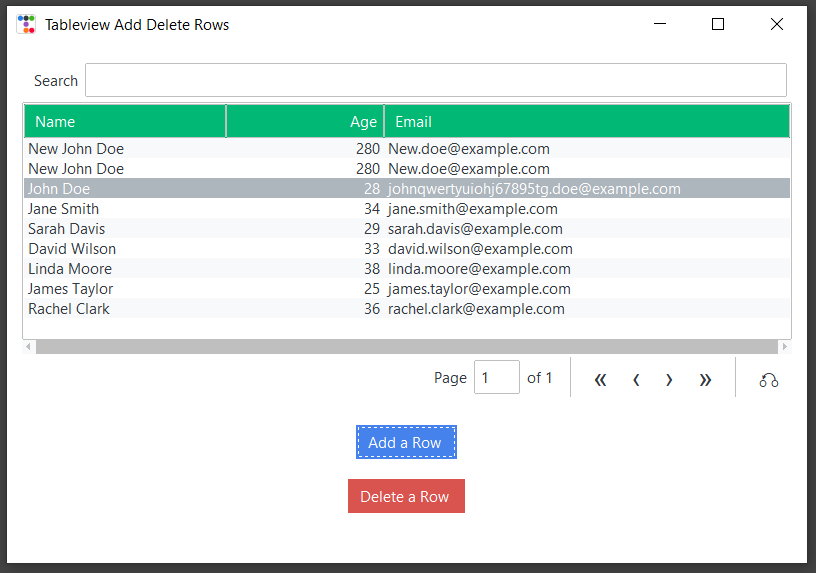
The Partial code below creates a basic GUI application that uses ttkbootstrap and its Tableview widget to display, add, and delete rows of data. The purpose is to demonstrate how to add and delete records (rows) from a table in the GUI. Full Code is available on GitHub (link above)
def Add_Record_Button_Handler():
   # add a single row
   new_row_data = ('New John Doe',280, 'New.doe@example.com') # has to be a tuple ,not a list
   data_table.insert_row(index = 0,values = new_row_data)     #insert data to the first row row 0
   data_table.load_table_data()                               # call Tableview.load_table_data() to update the current view.

def Del_Record_Button_Handler():
   data_table.delete_row(index = 0) #Delete the first row


root   = ttk.Window()
colors = root.style.colors
column_headers = [
                   {"text": " Name"            , "stretch": True, "anchor": "center"},
                   {"text": " Age"             , "stretch": True, "anchor": "center"},
                   {"text": " Email"           , "stretch": True, "anchor": "center"},

                ]
row_data = [
               ('John Doe'    , 28, 'johnqwertyuiohj67895tg.doe@example.com'),
               ('Jane Smith'  , 34, 'jane.smith@example.com'   ),
               ('Sarah Davis' , 29, 'sarah.davis@example.com'  ),
               ('David Wilson', 33, 'david.wilson@example.com' ),
               ('Linda Moore' , 38, 'linda.moore@example.com'  ),
               ('James Taylor', 25, 'james.taylor@example.com' ),
               ('Rachel Clark', 36, 'rachel.clark@example.com' ),

           ]
Add_Record_Button    = ttk.Button(text = 'Add a Row '   ,command = Add_Record_Button_Handler, bootstyle = PRIMARY)
Delete_Record_Button = ttk.Button(text = 'Delete a Row ',command = Del_Record_Button_Handler, bootstyle = DANGER)
data_table  = Tableview(
                        master     = root,
                        coldata    = column_headers,
                        rowdata    = row_data,
                        pagesize   = 10,
                        height     = 10,
                        autofit    = True,
                        paginated  = True,
                        searchable = True,
                        bootstyle  = SUCCESS,

                        stripecolor = (colors.light, None),
                       )
data_table.pack(fill = BOTH, expand = NO, padx = 15, pady = 15)
Add_Record_Button.pack(pady =10)
Delete_Record_Button.pack(pady =10)
root.mainloop()
First we create a simple table and populate it with some data.
Then we are using two buttons to Add and Delete Rows from a ttkbootstrap table as shown below
Add_Record_Button    = ttk.Button(text = 'Add a Row '   ,command = Add_Record_Button_Handler, bootstyle = PRIMARY)
Delete_Record_Button = ttk.Button(text = 'Delete a Row ',command = Del_Record_Button_Handler, bootstyle = DANGER)
Then inside the Button click Event handler we implement the add_row() method and delete_row() method to add and delete records.
def Add_Record_Button_Handler():
   # add a single row
   new_row_data = ('New John Doe',280, 'New.doe@example.com') # has to be a tuple ,not a list
   data_table.insert_row(index = 0,values = new_row_data)     #insert data to the first row row 0
   data_table.load_table_data()                               # call Tableview.load_table_data() to update the current view.

def Del_Record_Button_Handler():
   data_table.delete_row(index = 0) #Delete the first row
Tags
- Log in to post comments